Conversation


🥳 Feedback Received!
Thanks for taking a moment to share your thoughts — it genuinely helps us make each chapter sharper.
What happens next:
- Your feedback goes straight to our product team.
- We’ll use it to refine lessons, clarify examples, and make the program even more useful.
Appreciate you helping make this program better for everyone.
Ready for your next challenge? 👇
Apple Search Ads and App Store Optimization
Apple Search Ads: Your First Campaign Guide
For early-stage B2C founders ready to validate App Store traction
What You'll Learn
By the end of this guide, you'll have a live Apple Search Ads campaign capturing intent-based traffic from the App Store.
Why ASA Works for Early-Stage Apps
Apple Search Ads are different from social media advertising. When someone searches "budget app" or "workout tracker" in the App Store, they're already looking for what you built. ASA lets you appear at the top of those search results with a small "Ad" tag.
The opportunity: High intent, low competition, immediate validation of whether people want your app when they're actively looking for solutions like yours.
The reality: Low volume but high conversion rates. Perfect for traction-stage testing.
When to prioritize ASA:
- Your app is live on the App Store
- You have basic app store optimization in place (more on this below)
- You can spend $200-400 to get meaningful test data
- You want to validate specific keywords before scaling other channels
When ASA might not work:
- Extremely niche apps (under 1,000 monthly searches for core terms) - Consider starting with Discovery campaigns to uncover hidden volume for niche apps.
- Apps requiring lengthy education (users don't know to search for your solution)
- B2B apps where decision makers don't browse app stores
ASA Vocabulary Reference
Before we dive in to the meat of this lesson, let's make sure we're on the same page with terminology:
- Campaign: A group of ad groups sharing the same budget and settings
- Ad Group: A group of keywords sharing the same bid and targeting
- Keyword: The search term that triggers your ad
- Exact Match: Ad shows only for that exact search phrase [budget app]
- Broad Match: Ad shows for variations and related terms "budget app"
- Search Match: Apple automatically matches your ad to relevant searches
- Creative Set: The screenshots and video that appear in your ad
- Impressions: How many times your ad was shown to users
- Taps: How many times users clicked on your ad
- Installs: How many taps resulted in app downloads
- Redownloads: Users who previously downloaded your app and are downloading it again
- TTR (Tap-Through Rate): Percentage of impressions that became taps
- Conversion Rate: Percentage of taps that became installs
- CPT (Cost Per Tap): How much you pay when someone clicks your ad
- CPI (Cost Per Install): How much you pay for each app download
- CPA (Cost Per Acquisition): Target cost for valuable user actions
- Impression Share: Percentage of eligible impressions your ad received
- Search Terms: The actual words users typed that triggered your ad
- Negative Keywords: Keywords that prevent your ad from showing
Step 1: Fix Your App Store Listing First
ASA performance is tied directly to your app store page quality. Even perfect targeting won't work if your listing page converts poorly.
Title and Subtitle Optimization
Title format: [App Name]: [Primary Value Prop]
- Example: "Mint: Budget & Expense Tracker"
- Keep it under 30 characters
- Include your most important keyword naturally
How to update your title:
- Go to App Store Connect (appstoreconnect.apple.com)
- Click "My Apps" → Select your app
- Click the version number under "iOS App"
- Scroll to "App Information" section
- Click "Edit" next to "App Information"
- Update the "Name" field (this is your title)
Subtitle format: Concise value prop in 30 characters
- Example: "Save money. Reach your goals."
- Skip generic phrases like "world's best" or "download now"
- Focus on the outcome users get
How to update your subtitle:
- In the same "App Information" section
- Find the "Subtitle" field (appears below Name)
- Enter your 30-character value proposition
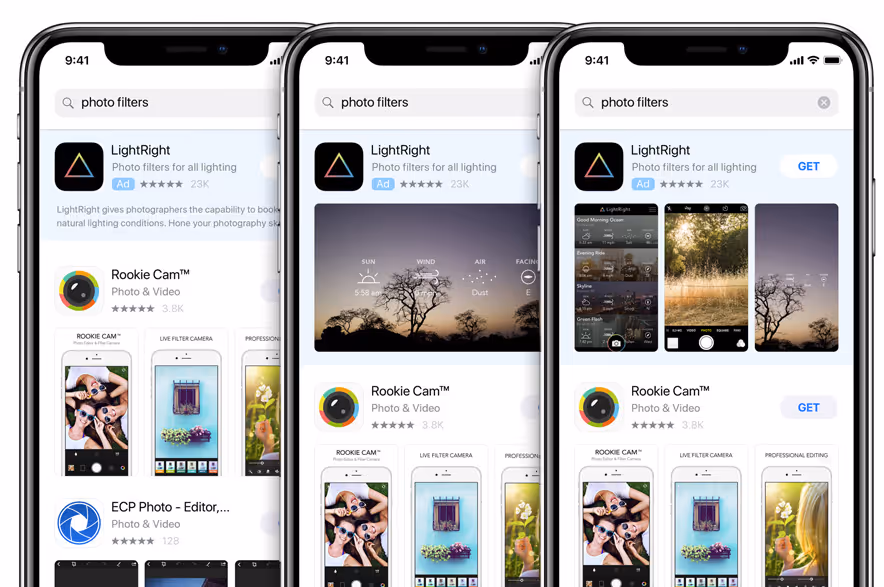
Screenshots That Convert
Treat your screenshots like ad creatives. Each one should tell a story about the value your app provides. This alone often moves the needle for conversions.
Screenshot Strategy:
Your screenshots are mini-advertisements. Most users decide within 3 seconds whether to download, so every screenshot must immediately communicate value.
The 5-Screenshot Framework:
Screenshot 1: Hero Value Prop
- Show your app's #1 benefit in action
- Add headline: "Track spending in seconds"
- Use contrasting text (white on dark overlay)
Screenshot 2: Problem/Solution
- Show the problem your app solves
- Headline: "Never overspend again"
- Include a before/after if possible
Screenshot 3: Key Feature
- Your most important feature in use
- Headline: "See exactly where your money goes"
- Show real data, not placeholder text
Screenshot 4: Social Proof
- Reviews, user count, or testimonials
- Headline: "Join 50,000+ happy users"
- Include star ratings if above 4.5
Screenshot 5: Call to Action
- Final push to download
- Headline: "Start saving money today"
- Show the outcome/result users get
Good vs Bad Screenshot Examples:
❌ Bad Budget App Screenshot:
- Just shows interface with no context
- Generic headline: "Manage your finances"
- No indication of specific benefit
- Placeholder data ($0.00 everywhere)
✅ Good Budget App Screenshot:
- Shows someone overspent by $200 with red warning
- Headline: "Get alerts before you overspend"
- Real transaction data visible
- Clear problem → solution narrative
Screenshot Creation Process:
- Take base screenshots: Use iPhone Simulator or actual device
- Add overlays in Canva/Figma:
- Dark overlay at 30-50% opacity
- White text, 24-30pt font size
- Contrasting colors for key elements
- Test headlines: Keep to 4-6 words maximum
- Check on device: View on actual iPhone to ensure text is readable
Screenshot Requirements by Device:
- iPhone 6.7": 1290 × 2796 pixels
- iPhone 6.5": 1242 × 2688 pixels
- iPhone 5.5": 1242 × 2208 pixels
- iPad Pro: 2048 × 2732 pixels
How to upload new screenshots:
- In App Store Connect, go to your app
- Click the version number under "iOS App"
- Scroll to "App Store Screenshots"
- Click the device type (iPhone 6.7", iPhone 6.5", etc.)
- Click the "+" to add new screenshots
- Upload your images (requirements: PNG or JPEG, specific sizes per device)
App Preview Video
If you have 2-3 hours to spare, create a 15-30 second App Preview video. It auto-plays in search results and typically boosts conversion rates 10-15%.
Video requirements:
- 15-30 seconds maximum
- MP4 format
- Specific resolutions per device type
- No external branding or calls-to-action
Simple video creation process:
- Screen record your app using iPhone's built-in recorder
- Edit in iMovie (free) or similar tool
- Add simple transitions between key features
- Export as MP4
How to upload App Preview:
- In the same "App Store Screenshots" section
- Above the screenshots, you'll see "App Preview" section
- Click "Choose File" and upload your MP4
- Apple will process and create a thumbnail automatically
Reviews and Ratings Target
Aim for 4.5+ star rating with 100+ reviews before spending heavily on ASA.
Where to check your current rating:
- Go to App Store Connect → Your app
- Click "App Analytics" in the left sidebar
- Look at the "Ratings and Reviews" section
- You'll see average rating and total review count
Getting your first 100 reviews:
Important: As of 2025, Apple emphasizes authentic reviews—avoid incentivizing or 'cheating the system'. Focus on earning reviews through genuine value delivery rather than rewards or manipulation.
In-app prompt setup:
- Use Apple's built-in SKStoreReviewController (ask your developer)
- Trigger prompts after positive actions (completed workout, saved money, etc.)
- Never prompt immediately after download—wait for value delivery
- Apple limits prompts to 3 times per year per user
Email review requests:
Send to users who've opened your app 5+ times in the past 30 days.
Email template:
Subject: Quick favor?
Hi [Name],
You've been using [App Name] for [time period] and I wanted to personally thank you. Users like you are the reason we can keep building.
Would you mind leaving a quick review on the App Store? It takes 30 seconds and helps other people discover us.
[Direct App Store review link]
Thanks!
[Your name], [Your title]
How to create direct review links:
- Go to your app's App Store page
- Copy the URL
- Add
?action=write-reviewto the end - Example:
https://apps.apple.com/us/app/your-app/id123456789?action=write-review
Step 2: Campaign Structure That Actually Works
We use a 4-campaign structure that balances simplicity with performance. Don't overcomplicate this.
The 4-Campaign Strategy
Campaign 1: Brand
- Purpose: Capture searches for your app name and variations
- Keywords: Your app name, company name, common misspellings
- Example: "budgetly", "budgetly app", "budget lee", "budgetlee"
- Budget: $50/week
- Why this budget: Brand searches have low competition but limited volume. Most apps see 10-50 brand searches per week. $50 ensures you capture 90%+ of brand searches without overspending.
Campaign 2: Generic
- Purpose: Capture broad value proposition searches
- Keywords: Core functionality terms without competitor names
- Example: "budget app", "expense tracker", "money management", "personal finance"
- Budget: $100/week
- Why this budget: Generic terms have highest volume but also highest competition. $100 gives you enough data to identify 3-5 winning keywords while staying cost-effective during testing.
Campaign 3: Competitor
- Purpose: Capture searches for your direct competitors
- Keywords: Competitor app names and branded terms
- Example: "mint app", "ynab", "personal capital", "quicken"
- Budget: $100/week
- Why this budget: Competitor searches are high-intent but expensive. Competitors often bid aggressively on their own terms. $100 tests viability without major risk.
Campaign 4: Discovery
- Purpose: Find new keywords automatically via Apple's algorithm
- Setup: Two ad groups - "Search Match" (no keywords) + "Broad Match" (all your exact keywords as broad match)
- Budget: $50/week
- Why this budget: Discovery is for learning, not scaling. $50 provides enough data to find 10-15 new keyword opportunities without overspending on untested terms.
Total weekly budget: $300 ($43/day)Expected results: 20-50 installs in first month, 50+ tested keywords, clear channel viability answer.
Step 3: Keyword Research and Sourcing
Where to Find Keywords
Method 1: Google Keyword Planner (Free) - 15 minutes
- Go to ads.google.com
- Click "Tools & Settings" → "Keyword Planner"
- Click "Discover new keywords"
- Enter your app's main function (e.g., "budget tracker")
- Export the keyword list
- Filter for keywords with "App" or mobile intent
Method 2: Apple's Suggestion Tool (Built-in) - 10 minutes
- When creating campaigns (we'll do this in Step 4), Apple shows "Recommended Keywords"
- Type your core terms and Apple suggests related keywords
- Save these suggestions in a spreadsheet
Method 3: Efficient Competitor Research - 20 minutes
Instead of manual App Store searches, use this faster approach:
- Quick competitive intel: Use AppAnnie (free tier) or SensorTower (free trial)
- Manual backup: Search your top 3 competitors in App Store
- Note "Related Searches" and "You Might Also Like" sections
- Check competitor ASA activity: Search their brand terms to see if they advertise
Method 4: Your Existing Ads (If Applicable)If you run Google Ads or Facebook Ads, export those keyword lists and adapt for mobile search intent.
Keyword Selection Rules
Good ASA keywords:
- 2-4 words long ("budget app" not "budgeting")
- Direct problem/solution match ("expense tracker" for an expense app)
- High intent ("download budget app" vs "budgeting tips")
Bad ASA keywords:
- Single broad words ("money", "fitness")
- Educational intent ("how to budget")
- Branded terms you don't own (unless in Competitor campaign)
Keyword Research for Niche Apps
If your app doesn't fit obvious categories:
Example: Meditation app for busy parents
- Start with core function: "meditation app", "mindfulness app"
- Add your unique angle: "meditation for parents", "quick meditation"
- Problem-focused terms: "stress relief app", "calm app"
- Competitor research: Find apps serving similar niches
- Use broad match discovery: Let Apple find related terms
Example: B2B expense app
- Function-first: "expense tracking", "receipt scanner"
- User-specific: "business expenses", "contractor expenses"
- Use case terms: "tax deduction tracker", "mileage tracker"
- Skip corporate terms: Most B2B users search like consumers in app stores
Building Your Keyword Lists
Create a spreadsheet with these columns:
- Keyword
- Campaign Type (Brand/Generic/Competitor/Discovery)
- Match Type (Exact/Broad)
- Priority (High/Medium/Low)
- Expected Volume (High/Medium/Low)
Target keyword counts:
- Brand: 15-20 keywords
- Generic: 25-30 keywords
- Competitor: 15-20 keywords
- Discovery: All of the above as broad match
Total target: 50-100 keywords for initial testing
Bidding strategy: Use priority levels to set initial bids higher on high-intent terms. Start with higher bids for "High Priority" keywords (typically brand and high-intent generic terms) and lower bids for "Medium/Low Priority" discovery keywords.
Step 4: Apple Search Ads Account Setup
Initial Account Creation
Step 1: Access Apple Search Ads
- Go to ads.apple.com/app-store
- Click "Sign In" (use your Apple Developer account)
- If you see a choice between "Search Ads Basic" and "Search Ads Advanced"
- Choose "Search Ads Advanced" (gives you more control)
Step 2: Account Setup
- Select your developer account if you have multiple
- Choose your country/region (start with your primary market)
- Accept the terms and conditions
- You'll land on the main dashboard
What you'll see on the dashboard:
- "Campaigns" tab (currently empty)
- "Ad Groups" tab
- "Keywords" tab
- "Creative Sets" tab
- Green "Create Campaign" button (top right)
Step 5: Creating Your First Campaign (Brand)
Let's start with your Brand campaign since it's the simplest.
Campaign Creation Walkthrough
Step 1: Start Campaign Creation
- Click the green "Create Campaign" button
- You'll see "Create Campaign" screen
Step 2: App Selection
- You should see your app automatically listed
- If you have multiple apps, click the correct one
- Click "Continue"
Step 3: Campaign Settings
- Campaign Name: Enter "[Your App Name] - Brand"
- Example: "BudgetTracker - Brand"
- Countries and Regions:
- Click "Countries and Regions"
- For first campaign, select just "United States" (or your primary market)
- Click "Save"
- Campaign Budget:
- Click "Set a budget"
- Enter "50" for $50 weekly budget
- Select "Weekly" from dropdown
- Click "Save"
- Campaign Start Date:
- Leave as "Start immediately after approval"
Step 4: Ad Group Creation
- Ad Group Name: Enter "Brand Keywords"
- Devices:
- If your app works on both: Select "iPhone" and "iPad"
- If iPhone only: Select just "iPhone"
- Demographics: Leave all settings as "All" (don't limit by age, gender, etc.)
- Default Max CPT Bid: Enter Apple's suggested bid amount (check during setup)
- Start with 50-100% of Apple's recommended bid for testing
- Example: If Apple suggests $1.50, start with $0.75-$1.50
- This means you'll pay up to that amount when someone taps your ad
- CPA Goal: Leave this blank (don't set a goal during testing)
Step 5: Search Match Setting
- You'll see "Search Match" toggle
- Turn this OFF for Brand campaigns
- We want exact control over brand keywords
Step 6: Adding Keywords
- Click "Add Keywords" button
- Method A - Manual Entry:
- Type your first brand keyword: [your app name]
- Click the dropdown next to it and select "Exact Match"
- Add another keyword: [your app name] app
- Continue adding your brand keywords one by one
- Method B - Bulk Upload:
- Click "Upload Keywords" option
- Download the template CSV
- Fill in your keywords with "EXACT" as match type
- Upload the completed file
Exact Match Format:
When you select "Exact Match," Apple will automatically add brackets [like this] around your keywords. This means the ad only shows for that exact phrase.
Complete your brand keyword list:
- [your app name]
- [your app name] app
- [your company name]
- [common misspellings]
- [your app name] download
Step 7: Creative Sets (Ad Appearance)
- You'll see "Creative Sets" section
- For beginners: Select "Use Default Creative Set"
- This uses your current App Store screenshots
- For advanced users: Click "Create Custom Creative Set" if you have campaign-specific screenshots
Step 8: Launch Campaign
- Review all settings on the summary page
- Click "Create Campaign"
- Your campaign status will show "Under Review"
- Apple typically approves campaigns within 24 hours
What Happens After Creation
Campaign Status Meanings:
- "Running" = Your ads are live and showing to users
- "Paused" = Campaign is created but temporarily stopped
- "On Hold" = Apple has paused your campaign (usually for policy review)
- "Removed" = Campaign has been deleted and cannot be reactivated
Next Day Check:
- Log back into ads.apple.com
- Click your campaign name
- Look for green "Serving" status
- If status is "Rejected," check Apple's feedback and adjust
Step 6: Creating Remaining Campaigns
Now create your other 3 campaigns using the same process, with these specific differences:
Generic Campaign Setup
Campaign Name: "[Your App Name] - Generic"
Budget: $100 weekly
Ad Group Name: "Core Features" (or create multiple ad groups like "Budget Features", "Expense Features")
Search Match: Turn OFF
Keywords: Use exact match for terms like:
- [budget app]
- [expense tracker]
- [personal finance app]
- [money management]
- [spending tracker]
Competitor Campaign Setup
Campaign Name: "[Your App Name] - Competitor"
Budget: $100 weekly
Ad Group Name: "Competitors" (or separate ad groups per competitor)
Search Match: Turn OFF
Keywords: Use exact match for competitor names:
- [mint]
- [mint app]
- [ynab]
- [personal capital]
- [quicken]
Important: Apple may reject trademarked competitor terms. Start with obvious ones and see what gets approved.
Discovery Campaign Setup
Campaign Name: "[Your App Name] - Discovery"Budget: $50 weekly
This campaign has 2 ad groups:
Ad Group 1: "Search Match"
- Ad Group Name: "Search Match"
- Search Match: Turn ON
- Keywords: Don't add any keywords
- How it works: Apple automatically matches your ads to relevant searches based on your app's metadata
Ad Group 2: "Broad Match"
- Ad Group Name: "Broad Match"
- Search Match: Turn OFF
- Keywords: Add all your exact match keywords from other campaigns, but change them to "Broad Match"
- Example: If you had [budget app] as exact match, add "budget app" as broad match
- How it works: Your ads show for variations and related terms
Step 7: Understanding Negative Keywords
This is the most confusing part for beginners, so let's break it down with examples.
What Negative Keywords Do
Negative keywords prevent your ads from showing for specific searches.
Example scenario without negative keywords:
- Your Generic campaign targets [budget app] (exact match)
- Your Discovery campaign has "budget app" (broad match)
- Someone searches "budget app"
- Both campaigns compete against each other
- You're essentially bidding against yourself
- Discovery campaign (with lower bids) might win instead of your optimized Generic campaign
Example scenario with negative keywords:
- Your Generic campaign targets [budget app] (exact match)
- Your Discovery campaign has "budget app" (broad match) + [budget app] as negative keyword
- Someone searches "budget app" exactly
- Only Generic campaign shows (Discovery is blocked by negative keyword)
- Discovery only shows for variations like "best budget app" or "budget tracker app"
How to Add Negative Keywords to Discovery
Step-by-step process:
- Go to your Discovery campaign
- Click "Keywords" tab
- Click "Negative Keywords" sub-tab (not the main Keywords tab)
- Click "Add Negative Keywords"
- Enter all your exact match keywords from other campaigns
- Set match type to "Exact Match" for each negative keyword
- Click "Save"
Complete negative keyword list for Discovery:
Add every exact match keyword from Brand, Generic, and Competitor campaigns as exact match negatives.
Example negative keywords list:
- [budgetly] (from Brand campaign)
- [budgetly app] (from Brand campaign)
- [budget app] (from Generic campaign)
- [expense tracker] (from Generic campaign)
- [mint] (from Competitor campaign)
- [ynab] (from Competitor campaign)
Why exact match negatives:
Using exact match negatives means Discovery is only blocked from showing on those exact terms, but can still show for variations.
Ongoing optimization: Regularly review Search Terms report to add irrelevant terms as negatives across campaigns to refine traffic.
Visual Example
Search term: "budget app"
- ✅ Generic Campaign: [budget app] (exact match) → Shows
- ❌ Discovery Campaign: Has [budget app] as negative → Blocked
Search term: "best budget app"
- ❌ Generic Campaign: [budget app] (exact match) → Doesn't match
- ✅ Discovery Campaign: "budget app" (broad match) → Shows (not blocked by exact negative)
This ensures each campaign serves its purpose without overlap.
Step 8: Budget and Bid Setup
Setting Daily Budgets
Convert weekly to daily budgets:
- $50 weekly = $7.14 daily ($50 ÷ 7)
- $100 weekly = $14.29 daily ($100 ÷ 7)
How to set daily budgets:
- Go to each campaign
- Click "Settings" tab
- Click "Edit" next to budget
- Change to daily and enter your calculated amount
- Click "Save"
Understanding Bid Strategy
Understanding Bid StrategyWhat CPT (Cost Per Tap) means:
- This is the maximum you'll pay when someone clicks your ad
- You usually pay less than your max bid
- Use intent-based segmentation when setting initial bids
Intent-based bidding strategy:
- High intent (Brand campaigns): Start with $3.00-4.00
- Users searching for your app name are ready to download
- Medium intent (Generic campaigns): Start with $2.00-3.00
- Users searching for solution-specific terms like "budget app"
- Low intent (Discovery campaigns): Start with $1.00-2.00
- Users searching broader terms, less likely to convert immediately
- Competitor campaigns: Start with $2.50-3.50
- Users comparing options, moderate to high intent
Why intent-based bidding works: Bottom-funnel terms (brand searches) have higher conversion rates, so you can afford to pay more per tap while maintaining profitable unit economics.
Bid Adjustment Decision Tree
When to increase bids (+25% vs +50% logic):
Increase by 25% if:
- Getting some impressions (100+/week) but want more
- Impression share is 30-60%
- CPI is profitable but volume is low
Increase by 50% if:
- Getting zero or very few impressions (<50/week)
- Impression share is under 30%
- Keyword is clearly profitable but not getting volume
When to decrease bids:
Decrease by 25% if:
- CPI is 1.5-2x your target (slightly expensive but getting installs)
- High spend with moderate results
Decrease by 50% if:
- CPI is 3x+ your target (way too expensive)
- High spend with zero installs after 5+ days
Bid adjustment examples:
Scenario 1: Keyword getting 500+ impressions, 20 taps, 4 installs, $2.50 CPI (target is $3.00)→ Action: Increase bid 25% to get more volume
Scenario 2: Keyword getting 50 impressions, 2 taps, 0 installs after 5 days→ Action: Either increase bid 50% (if you believe in the keyword) or pause
How to check and adjust bids:
- Go to campaign → Keywords tab
- Look at each keyword's performance after 3-5 days
- Click "Edit" next to keywords that need bid changes
- Adjust up or down based on decision tree above
Step 9: Reading Your Performance Data
Where to Find Performance Metrics
Campaign Level Data:
- Go to Campaigns tab
- You'll see columns for:
- Impressions (how many times your ad was shown)
- Taps (how many people clicked)
- Installs (how many downloaded your app)
- Spend (how much you've paid)
Keyword Level Data:
- Click into any campaign
- Click "Keywords" tab
- See performance for individual keywords
Key Metrics to Track
Impressions: How many people saw your ad
- Excellent: 1,000+ per week for generic keywords (top 10% of campaigns)
- Good: 500-1,000 per week (healthy performance)
- Poor: Under 100 per week (increase bids or reassess keywords)
- Context: Generic keywords typically get 3-5x more impressions than competitor terms
Tap-Through Rate (TTR): What % of people who saw your ad clicked it
- Excellent: 8%+ for generic keywords, 20%+ for brand keywords (top 10%)
- Good: 5-8% for generic, 15-20% for brand (industry average)
- Poor: Under 3% for generic, under 10% for brand (app store page issues)
- Context: TTR varies significantly by category. Finance apps typically see lower TTR than games
Conversion Rate: What % of taps became installs
- Excellent: 30%+ (best-in-class app store pages)
- Good: 20-30% (well-optimized app store page)
- Poor: Under 15% (focus on app store optimization immediately)
- Context: This is entirely controlled by your app store page quality, not your ASA targeting
Cost Per Install (CPI): How much you pay for each app download
- Target: 2-3x your app's lifetime value
- Example: If users are worth $15 to you, keep CPI under $5-7
- Context: CPI varies dramatically by category:
- Utility apps: $1-5
- Finance apps: $3-8
- Gaming apps: $2-6
- Social apps: $1-4
How to Calculate These Metrics
TTR = (Taps ÷ Impressions) × 100
- Example: 50 taps ÷ 1,000 impressions = 5% TTR
Conversion Rate = (Installs ÷ Taps) × 100
- Example: 10 installs ÷ 50 taps = 20% conversion rate
CPI = Spend ÷ Installs
- Example: $100 spend ÷ 20 installs = $5.00 CPI
Apple calculates these automatically, but understanding the math helps you optimize.
Step 10: Week 1 Monitoring and Troubleshooting
Daily Check Routine (5 minutes)
Day 1-2: Launch Check
- Confirm all campaigns show "Serving" status
- Check for any rejected keywords
- Verify you're getting impressions (at least 50-100 per day)
Day 3-5: Early Performance
- Look for campaigns with zero impressions (increase bids)
- Check total spend vs. budget (should be spending 70-80% of daily budget)
- Note any early install patterns
Day 6-7: First Optimization Prep
- Identify keywords with 2+ installs
- Note keywords with high spend but zero installs
- Prepare for first optimization round
Common Week 1 Problems and Fixes
Problem: Zero Impressions
- Cause: Bids too low or keywords too competitive
- Fix: Increase bids by 50% ($2.00 → $3.00)
Problem: High Impressions, Zero Taps
- Cause: Poor app store screenshots or misleading keywords
- Fix: Review your app store page, improve screenshots
Problem: High Taps, Zero Installs
- Cause: App store page doesn't convert visitors
- Fix: Focus on app store optimization before spending more
Problem: Spending Budget Too Fast
- Cause: Bids too high or very competitive keywords
- Fix: Lower bids by 25% or reduce daily budget temporarily
Problem: Brand Campaign Losing Impression Share
- Cause: Competitors bidding on your brand terms
- Fix: Increase brand campaign bids aggressively
When to Quit ASA
Clear signals ASA isn't working for your app:
After 2 weeks:
- CPI consistently 5x+ your target across all campaigns
- App store conversion rate under 10% despite optimization
- Total weekly installs under 5 across all campaigns (for mainstream apps)
- Zero profitable keywords identified
Category-specific quit thresholds:
Mainstream apps (productivity, finance, fitness):
- Under 5 installs/week after 2 weeks
- Under 500 total weekly impressions across all campaigns
Niche apps (specialized tools, B2B-ish):
- Under 2 installs/week after 2 weeks
- Under 200 total weekly impressions across all campaigns
- Consider: your niche might be too small for App Store search
After 4 weeks:
- Unable to achieve break-even CPI on any keywords
- Limited search volume (under thresholds above)
- Competitor campaigns getting zero impressions (indicates no market interest)
Before quitting, try this rescue sequence:
- Focus fire: Put all budget into your single best-performing campaign
- App store overhaul: Completely redo screenshots using framework above
- Keyword reset: Test 5-10 completely different keyword themes
- Consider timing: Maybe your app needs more organic traction/reviews first
Signs your app needs organic growth first:
- Under 50 total App Store reviews
- Below 3.5 star rating
- Very few organic installs per week
- Users don't understand your value prop from screenshots
ASA Troubleshooting Flowchart
When things go wrong, follow this priority order:
Problem 1: Zero Impressions
Symptoms: Campaign shows 0-50 impressions after 48 hoursPriority: Fix immediately (you're not in the auction)
Troubleshooting steps:
- Check campaign status: Must show "Serving" (not "Paused" or "Under Review")
- Increase bids by 50%: $2.00 → $3.00 for all keywords
- Wait 24 hours for changes to take effect
- Still zero impressions? Your keywords might be too competitive - try different keyword themes
Problem 2: High Impressions, Zero Taps
Symptoms: 500+ impressions but under 10 taps (TTR under 2%)Priority: Fix before spending more (your app store page isn't compelling)
Troubleshooting steps:
- Review your app icon: First thing users see - is it clear and professional?
- Check keyword relevance: Are you targeting "meditation app" but your app is actually "sleep sounds"?
- Improve first screenshot: Follow the 5-screenshot framework above
- Wait 3-5 days to see TTR improvement before other changes
Problem 3: High Taps, Zero Installs
Symptoms: Good TTR (5%+) but conversion rate under 10%Priority: High - you're paying for clicks that don't convert
Troubleshooting steps:
- Screenshot audit: Do screenshots match what users expect from your keywords?
- Check app reviews: Are recent reviews highlighting problems?
- Test your app store page: Visit it yourself - is the value proposition clear?
- Consider app preview video: Can boost conversion 10-15%
Problem 4: Everything Works But CPI Too High
Symptoms: Getting impressions, taps, and installs, but CPI is 3x+ your targetPriority: Optimize before scaling
Troubleshooting steps:
- Focus on best keywords: Pause keywords with CPI above 5x target
- Lower bids by 25% on expensive keywords
- Improve app store conversion rate (impacts all keywords)
- Consider if your LTV calculation is accurate
When Multiple Problems Occur
Fix in this order:
- Zero impressions (can't test anything else)
- Zero taps (indicates targeting/creative mismatch)
- Zero installs (app store page issues)
- High CPI (optimization issues)
Don't change multiple things at once - you won't know what fixed the problem.
Step 11: Simple Approach to Scaling
When to Scale Up
Scale spending if:
- CPI is below your target consistently
- You're not hitting daily budget caps
- Install volume is meaningful (10+ installs per week)
- App store conversion rate is 15%+
How to scale:
- Increase daily budgets by 25-50%
- Add more keywords to winning campaigns
- Expand to additional countries
- Test higher bids on profitable keywords
When to Scale Down
Reduce spending if:
- CPI is consistently above target after 2 weeks
- App store conversion rate is below 10%
- Limited budget needs to be focused elsewhere
Integration with Other Marketing Channels
ASA + Google Ads coordination:
Don't pause Google Ads during ASA testing. Instead:
- Run both channels simultaneously for 2-4 weeks
- Compare CPI and user quality between channels
- Use ASA keyword insights to improve Google Ads targeting
- Focus budgets on the better-performing channel after testing
Budget coordination example:
- Currently spending: $500/month on Google Ads
- ASA testing budget: $300/month ($75/week × 4 weeks)
- Option 1: Reduce Google Ads to $300/month, add $300 for ASA
- Option 2: Keep Google Ads at $500, add $300 for ASA (if you can afford $800 total)
- Recommended: Start with Option 1 for budget-conscious founders
ASA + Social Media Ads:
- ASA captures bottom-funnel intent (people already looking)
- Social media creates top-funnel awareness
- Best practice: Use social ads to drive app store visits, ASA to capture searches
ASA + Content Marketing:
- Create blog content around your winning ASA keywords
- Build organic search presence for terms that work in ASA
- Use ASA data to validate content marketing topics
Common Mistakes to Avoid
Setting Up Too Many Campaigns
Mistake: Creating 10+ campaigns for different keyword themes
Why it fails: Spreads budget too thin, harder to optimize
Do instead: Stick to the 4-campaign structure
Optimizing Too Early
Mistake: Making changes after 1-2 days
Why it fails: Not enough data to make good decisions
Do instead: Wait 5-7 days before major changes
Ignoring App Store Optimization
Mistake: Running ASA with poor app store screenshots/description
Why it fails: Traffic won't convert regardless of targeting
Do instead: Fix app store page before spending on ads
Setting CPA Goals During Testing
Mistake: Adding CPA goals in first 2 weeks
Why it fails: Limits Apple's learning and data collection
Do instead: Let campaigns run without CPA limits initially
Targeting Irrelevant Keywords
Mistake: Adding "productivity" keywords to a budget app
Why it fails: Low intent, poor conversion rates
Do instead: Focus only on direct-intent keywords
Not Adding Negative Keywords
Mistake: Letting Discovery campaign compete with exact match campaigns
Why it fails: Wastes budget on keywords you're already targeting
Do instead: Add all exact match keywords as negatives to Discovery
Bidding Too Low Initially
Mistake: Starting with $0.50 bids to "save money"
Why it fails: Won't get impressions, can't gather data
Do instead: Start with $2.00 bids, adjust based on performance
Overlooking Localization
Mistake: Using the same campaign settings for all regions
Why it fails: Different countries have varying competition levels and user behavior
Do instead: Tailor campaigns per region—adjust bids, keywords, and creative based on local market conditions