
Google Tag Manager (GTM)
What you’ll learn
- What Google Tag Manager (GTM) is
- How to use GTM to set up conversion tracking and analytics
Overview
Google Tag Manager (GTM) is a tool for sending your site data to third-party tools like Facebook and Google Analytics.
At its core, GTM puts code snippets on your site. This lets you tell these third-party tools when people visit pages, or when people click on a specific button or submit a form.
Here’s a picture of how it works:
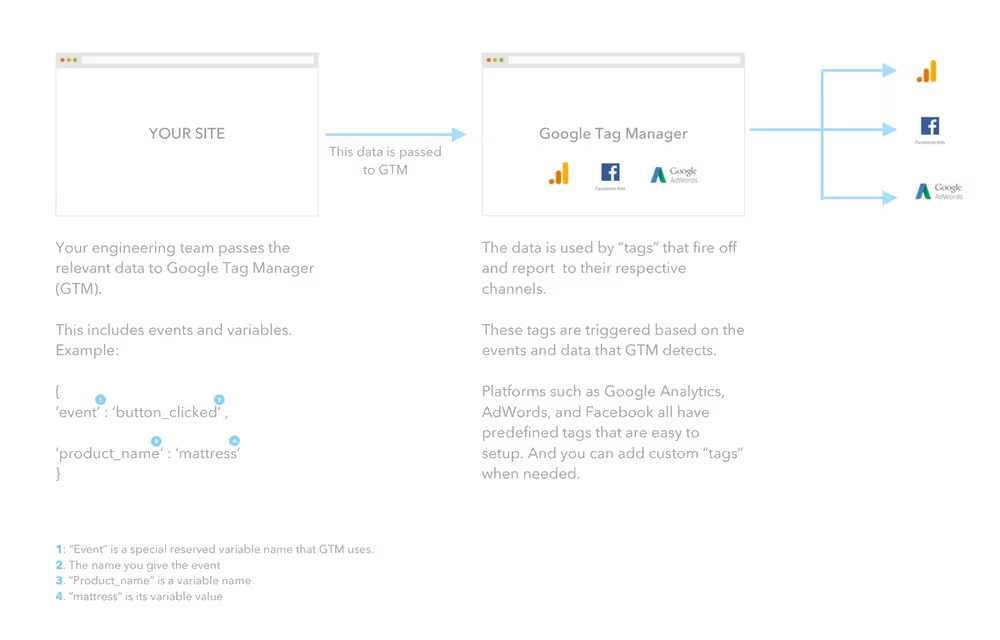
You add GTM on your site by inserting GTM's code snippet.
Your site logs different events (such as a button click) and variables (such as the product you clicked the button for), and passes that data to GTM. GTM then uses that data and reports it to the different tools/channels.
If this feels like it’s too complicated, that’s OK. You don’t have to know the guts of how it works to use it properly.
Read through the sections below to get an overview of what’s in GTM, but it’s OK if you don’t remember everything. Things will feel a lot more intuitive once you start the project.
Tags, Triggers, and Variables (oh my!)
Tags and Triggers
Google Tag Manager, as you can probably guess from the name, is all about tags. Tags are snippets of code that GTM puts on your site and fires when a defined “trigger” happens.
Trigger
A trigger can be any of these:
- Page view (all or specific pages)
- Clicks
- Page element in view
- Form submit
- Scroll page depth
- YouTube video watch
- Error triggered
- Timer completes
- Custom event (triggered in code)
For technical folks: You can add triggers based on code as well: things like HTML classes and ids on page elements like links and forms. These are a bit dangerous because your engineering team may change these without telling you, breaking the trigger. You can also trigger based off Segment events if GTM is a Destination in Segment.
If you need a piece of data from the site when the trigger fires, like the user’s email address, then you’ll need the engineers to add code to handle that anyway. They may as well add the event trigger.
Tags
Tags are how you hook into your third-party tools like Facebook or Google Analytics. Some built-in tags include:
- Google Analytics
- Hotjar, which lets you see live video recordings of people using your site.
- Ad channels
For anything else, you can set up custom tags and copy and paste specific code snippets. This lets you put any tool you like on your site, such as Facebook tracking, Intercom, and anything else.
Variables
To save yourself from repetitive work, and to pass data from your site/app into GTM, you’ll need variables.
Example: your user has to submit their email before they can schedule a demo with you. In GTM, every single email is going to be different: joe@example.com, renee@othercompany.com, etc.
If you create a variable containing the user’s email address, and you call it User Email , you can then insert it in your tags as {{User Email}}. Instead of pasting each email address individually.
So, wherever GTM sees {{User Email}}, it will use the actual value of the variable: joe@example.com.
In other words, once a variable is defined, you can use it by using its “symbolic name” in double curly brackets.
There are two kinds of variables in GTM.
Built-In Variables
These are automatically pulled from your website by GTM. All you need to do is go in and “Configure” (choose) which ones you want GTM to include.
Example built-in variables:
- Page URL
- For example, yoursite.com/sign_up
- For example, yoursite.com/log_in
- Error Message
- For example, page crashed
- Video status
- For example, video started
- Scroll depth
- For example, 50% of the way down the page.
User-Defined Variables
User-defined variables are things like the user’s email address, or purchase revenue. (Things that aren't on every website.)
Next
Now move onto Conversion Tracking - Advanced > Project: GTM.