Conversation


🥳 Feedback Received!
Thanks for taking a moment to share your thoughts — it genuinely helps us make each chapter sharper.
What happens next:
- Your feedback goes straight to our product team.
- We’ll use it to refine lessons, clarify examples, and make the program even more useful.
Appreciate you helping make this program better for everyone.
Ready for your next challenge? 👇
Project: Shopping Ads
Introduction
Now that you’ve set up Google Merchant Center (GMC) and synced your product data, it’s time to create and launch your first Google Shopping Ads campaigns.
This project guides you through building a dedicated Standard Shopping Campaign to test product performance, transitioning to a Smart Shopping Campaign later for automation, and preparing for Performance Max (PMax) expansion in the future.
You’ll leverage Google’s automation and minimal setup to drive efficient growth.
What you’ll do
- Create a Standard Shopping Campaign in Google Ads, pulling products from GMC to test performance.
- Launch the campaign, monitor early results, and prepare to transition to a Smart Shopping Campaign after proving profitability.
- Set up product groups for organization and optimization, preparing for scaling or Performance Max integration later.
Phase 1: Create Standard Shopping Campaigns
Follow these steps to build a Standard Shopping Campaign, ideal for startups testing 10–20 high-margin products (e.g., premium lawn mowers) with control and automation:
1. Set up the campaign in Google Ads
- Navigate to campaigns:
- In Google Ads, go to Campaigns > click + New Campaign.
- Select Sales > Shopping > choose your linked Google Merchant Center account.
- Configure campaign settings:
- Country of sale: Match your GMC product feed’s country. If using Shopify, this defaults to your store locale—use one country per campaign. For Google Sheets feeds, you can include multiple countries, but start with one.
- Campaign type: Choose Standard Shopping to start, offering control over product groups and targeting.
- Campaign name: Use a structured name like “Shopping – Standard – U.S.-EN” for clarity and organization.
- Bidding: Select Target ROAS (e.g., 300%) or Target CPA (e.g., $50) for automation.
- Budget: Set a daily budget of $20–$50 to test efficiently on a limited budget, aiming for at least 3x your acceptable CAC over 7 days (e.g., $150/week for a $50 CAC target).
- Networks: Include Search partners for broader reach on Google’s search network, but exclude Display initially (handled by Smart Shopping or PMax later).
- Locations: Target “Presence: People in or regularly in your targeted locations” to focus on residents, reducing irrelevant traffic. Expand location options (advanced) to include or exclude specific areas depending on your business.
- Click Save and continue
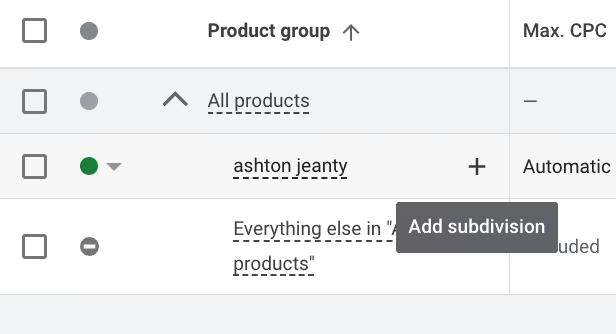
2. Create product groups
- Set up product groups:
- In the campaign, go to Product groups (under the campaign settings).
- Start with “All products” as the default group, then subdivide for control:
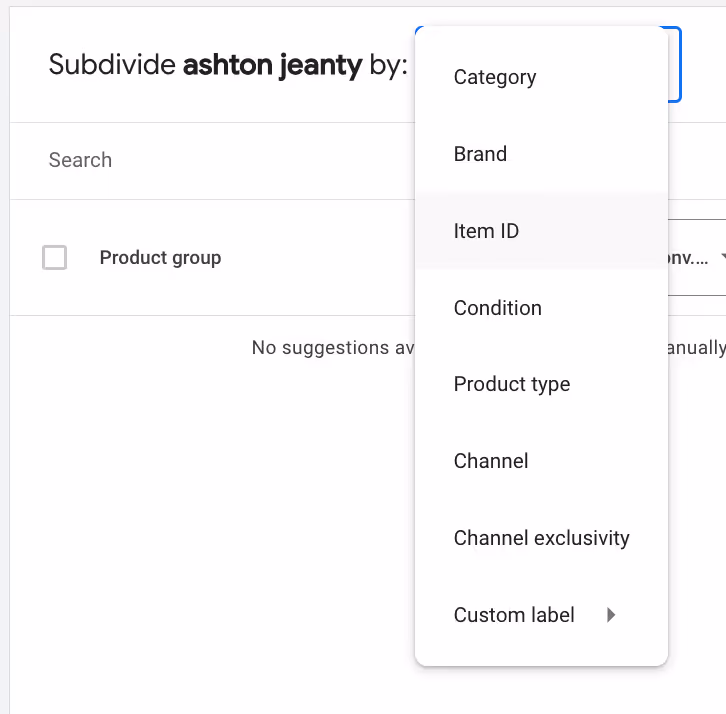
- Hover over “All products,” click the + icon, and select “Subdivide All products by” > Item ID (for specific product variations, recommended for most startups) or Product type (for broader categories, e.g., “Lawn Mowers,” “Garden Tools”).
- Select all products or filter to include only high-margin, top-selling items (e.g., 10–20 products like premium lawn mowers, excluding low-value items like gift cards).
- Organize for optimization:
- Create 1–3 product groups per campaign (e.g., "All products," “Premium Lawn Mowers,” “Garden Tools,” “Accessories”) for organizational clarity and bid management.
- Use GMC custom labels (e.g., “High-Margin,” “Seasonal”) to refine groups if needed, but keep it simple initially.
- Save and continue: Click Save to finalize product groups.
3. Add negative keywords
- Add initial negative keywords to prevent wasted spend on irrelevant searches:
- Products you don’t sell: Exclude similar or related terms (e.g., “DIY tools,” “rental equipment” for landscaping).
- Attributes or certifications not met: Exclude terms like “organic,” “fair-trade,” “vegan,” or “for men” if irrelevant (e.g., for women’s products only).
- Low-intent terms: Exclude “what is X,” “how to Y,” “tutorials,” “lessons” to focus on buying intent.
- Free or cheap products: Exclude “free,” “cheap,” “discount,” “coupon,” “download,” “torrent” unless your products are low-cost or free.
- Go to Keywords > Negative keywords in your campaign, add these terms, and save.
4. Update tracking
- Adjust the tracking template for UTM parameters to track Shopping Ads:
- In Settings > Additional settings > Tracking, add a tracking template like ?utm_source=google&utm_medium=shopping&utm_campaign={campaignid} to monitor performance in Google Analytics 4 (GA4).
Phase 2: Launch your Standard Shopping Campaign
- Activate the campaign:
- Review all settings, product groups, and negative keywords for errors (e.g., disapproved products in GMC, missing fields).
- Set the campaign status to Enabled in Google Ads.
- Verify your budget ($20–$50/day) and ensure no technical issues (e.g., tracking errors, disapproved assets).
- Monitor initial performance:
- Check the campaign daily for the first week to ensure ads serve, budgets align (e.g., $20–$50/day not overspent), and no technical issues arise (e.g., GMC sync errors, disapproved products).
- Use columns like impressions, clicks, CTR, conversions, CPA, and ROAS to monitor early results, focusing on Google Search and the Shopping tab.
- Avoid over-optimizing: Resist making changes in the first 7–14 days—Google needs time to learn and optimize with Smart Bidding and Broad Match.
Phase 3: Optimize your Standard Shopping Campaign
You don't have a ton of control with Shopping campaigns but there is a bit you can do, such as:
- Search Terms analysis: Go through and add negative keywords for irrelevant searches.
- Ad group analysis: With your specific asset/product groups you can see at a high level if they're performing well or not.
- Specific product analysis:They make this a lot harder to find than they need to, but you can in fact see each product's individual performance. Here's how to do that
- Navigate to the campaign's Product Group
- Beside the Product Group name you'll see a + when you hover, click it
- You'll see a dropdown at the top that lets you segment the products by, click that and choose Item ID
- Configure the columns to be Cost, Conversion Value/Cost, and Conversions and sort by Descending so you can see the relative performance of each product
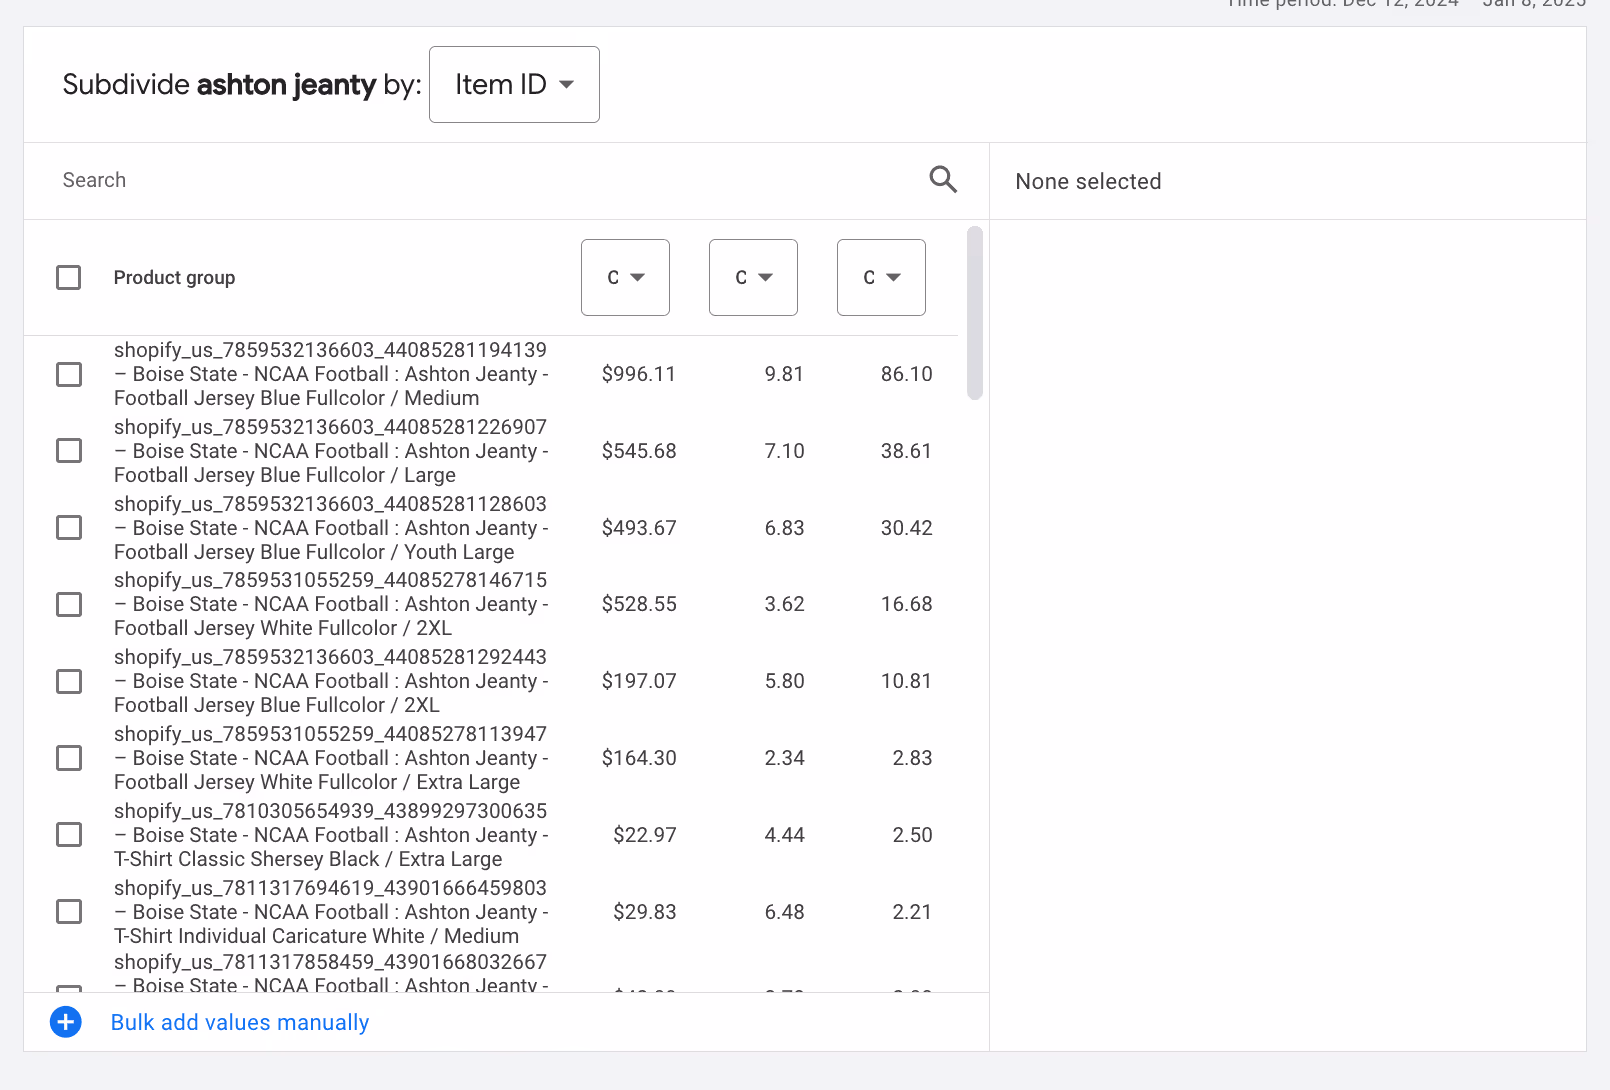
- You can then select individual products and increase or decrease your bid on them. Or, you can break top winners into their own campaigns and set high budgets, or you can remove the bad performers from the product group entirely.
Phase 4: Transition to a Smart Shopping Campaign (After 30–60 Days)
If your Standard Shopping Campaign proves profitable and you get ~100 conversions, transition to a Smart Shopping Campaign for automation and broader reach:
1. Set up the Smart Shopping Campaign
- Navigate to campaigns:
- In Google Ads, go to Campaigns > click + New Campaign.
- Select Sales > Shopping > choose your linked Google Merchant Center account.
- Configure campaign settings:
- Country of sale: Match your Standard campaign’s country (e.g., United States for English-speaking U.S. store).
- Campaign type: Choose Smart Shopping for full automation.
- Campaign name: Use a structured name like “Shopping – Smart – U.S.-EN” for clarity.
- Bidding: Select Target ROAS for revenue-based goals, or Maximize Conversions if focusing on volume.
- Budget: Set a daily budget similar to your Standard campaign.
- Networks: Include Search partners and Display Network for broader reach.
- Click Save and continue to launch
- no product groups or ad groups needed, as Smart Shopping optimizes all products dynamically.
2. Monitor Smart Shopping Performance
- Check weekly for 30 days to ensure ads serve, budgets align, and performance meets goals.
- Use columns like impressions, clicks, CTR, conversions, CPA, and ROAS, focusing on Search, Shopping tab, and Display Network.
Note, there isn't much you can do to optimize it however.
Phase 5: Prepare for Performance Max (Optional, After 60+ Days)
After proving profitability with Standard and Smart Shopping Campaigns, consider transitioning to Performance Max for cross-channel growth:
Set up PMax:
See the lessons on Performance Max for the full instructions.
- In Google Ads, create a PMax campaign (covered in earlier Performance Max lessons).
- Upload assets (3–5 images, 5 headlines, 5 descriptions, optional video) and set a goal (e.g., Target ROAS 300%)
- Attach your products from your Google Merchant Center account to the campaign.
- Allocate 20–30% of your total budget to test PMax, monitoring for 30–60 days.
That's about all there is to Shopping Ads!