Conversation


🥳 Feedback Received!
Thanks for taking a moment to share your thoughts — it genuinely helps us make each chapter sharper.
What happens next:
- Your feedback goes straight to our product team.
- We’ll use it to refine lessons, clarify examples, and make the program even more useful.
Appreciate you helping make this program better for everyone.
Ready for your next challenge? 👇
Project: Optimize Google Ads
Overview
When evaluating your Google Ads campaigns, optimize from the lowest level (search terms, keywords) to the highest (campaigns). Pausing a poorly performing campaign might seem tempting, but digging deeper often reveals one underperforming keyword dragging down the rest, leaving profitable opportunities behind.
Here’s the recommended order for evaluating and optimizing Google Ads:
- Search terms
- Keywords
- Ads
- Ad assets (extensions)
- Audiences (demographics, locations, ad schedules)
- Devices
- Bid strategies
- Ad groups
- Campaigns
Each section below details how to optimize that element and suggests how often to focus on it. The frequency depends on your impression, click, and conversion volume. With low volume (e.g., 100 clicks/month across 100 keywords), data accumulation takes longer—adjust these guidelines based on your account’s activity.
Phase 0: Start a log
Before optimizing, maintain a Google Doc or spreadsheet to log major changes and rationales.
Here’s an example we used internally for a real client (this example is for Facebook, but the format is the same).
This helps track performance after adjustments, such as adding negative keywords or tweaking ad copy. For example:
- Exclude “starter kit” as a negative keyword across campaigns.
- Rationale: We’ve spent $500 with no conversions, and it’s low-intent.
Phase 1: Search Terms
When: Every time you optimize.
Analyzing search terms is one of the most critical optimization for Google Ads, especially early in a campaign. It reveals the actual queries triggering your ads, helping you find new keywords and identify irrelevant searches for negative keywords.
In modern SEM, Google primarily uses Broad Match keywords, relying on its machine learning to match queries to your ads based on intent, context, and user behavior. For example, for a UI design tool like Framer, a Broad Match keyword like “design tool” might trigger searches like “UI design software” or “best design tool for websites”—but also irrelevant queries like “clothing design tool” or “tool for designing a building.” To stop wasting money on irrelevance, add “clothing,” “clothes,” “shirts,” and “building” as negative keywords.
You can also reassign high-performing search terms to better-suited ad groups or campaigns. For instance, if a keyword in a high-intent ad group triggers one that is better suited for a problem-solution ad group, then add it as a keyword to the other ad group and add a negative keyword to its current one.
Procedure for finding negative keywords
- Navigate to the campaign or ad group you want to optimize.
- Set the time range from your last review to today (e.g., last 7–14 days).
- Click Insights and reports > Search terms in the left navigation.
- Scroll through the list and select irrelevant queries, such as:
- Searches for entirely different industries or products (e.g., “college design program” for a UI tool, “graphic design program” if irrelevant, “windows design program” if your product is Mac-only).
- Low-intent queries with words like “what is,” “how to,” “example,” “lesson,” “course,” “tutorial,” or “torrent.”
- Keywords better suited for different ad groups.
- Click Add as negative keyword.
- Choose where to add it (e.g., ad group, campaign, or shared negative keyword list).
- Add broadly (e.g., campaign level) to reduce repetition, but ensure it won’t harm other ad groups.
- For account-wide irrelevance, use the “All Campaigns” negative keyword list.
- Click Save and repeat for other ad groups.
Procedure for positive keywords
- Scroll through the search terms and identify relevant, high-performing queries (e.g., “UI design tool,” “best design software” for Framer).
- Use these insights to:
- Update ad copy or landing pages to align with common searches, improving relevance and Quality Score.
- You probably don't need to worry about adding too many minor keyword variations as Broad Match dynamically captures them, but do it if they're quite different and are performing well.
- Click Save and repeat for other ad groups.
Phase 2: Keywords
When: Every time you optimize
Continuously refine your Broad Match keywords to focus on winners and pause losers, leveraging Google’s automation and data.
Phase 2a: Adjust current keywords
- Review keyword performance over at least the last 14 days using columns like impressions, clicks, conversions, CPA, and ROAS.
- With automated bidding (e.g., Target CPA, Target ROAS, Maximize Conversions):
- Let Google handle bid adjustments dynamically—don’t manually adjust bids.
- Pause Broad Match keywords consistently exceeding your target CPA (e.g., >$150 if your target is $50) after spending 2–3x the target CPA (e.g., $150 spent with no conversions).
- Use segmentation (e.g., device, location, demographics) to identify high-performing segments and refine targeting if needed (e.g., increase focus on mobile if it converts better).
- Avoid pausing keywords too early—wait for sufficient data (50+ conversions/campaign over 30 days) to ensure confidence in performance.
Phase 2b: Add more keywords/ad groups
If you identify keywords that are performing well that follow a certain trend, consider breaking it out into its own ad group and tailor the ad copy to the specific keywords.
Phase 2c: Create new landing pages (optional)
- If certain keywords or ad groups perform significantly better, consider creating landing pages optimized for those terms (e.g., “Landscaping Services Near Me” page).
- Update ad destinations to point to these pages, improving Quality Score, lowering CPCs, and boosting conversions.
- Monitor performance after changes—new pages don’t always outperform existing ones.
Phase 3: Ads
When: Every time you optimize
Optimize ads by refining ad copy (e.g., Responsive Search Ads) based on performance. Google prioritizes high-performing ads dynamically, so focus on top performers and pause underperformers.
Procedure
- Select an ad group.
- Set the time range to at least 14 days (or between today and your last optimization).
- Click Ads & Assets > Ads.
- Filter out paused or removed ads.
- Sort by % Served(ascending) to identify poorly performing ads.
- Pause ads with <5–10% served (adjust based on the number of ads running—remove those barely shown).
- Sort by Cost(descending) to find high-cost, low-conversion ads.
- Pause ads if others perform >20% better in conversions or CPA.
- Sort by Cost/Conv.(ascending) to identify top performers.
- Duplicate top-performing ads and test variations (e.g., new headlines, descriptions) to improve performance.
- Create entirely new ad variations inspired by best performers, focusing on relevance and intent aligned with Broad Match queries.
- Save changes and repeat for other ad groups.
Phase 4: Ad Assets
When: Every month.
Optimize ad extensions (e.g., sitelinks, callouts, structured snippets) at the campaign or ad group level, as performance varies. Track performance to ensure extensions improve CPA or ROAS.
Procedure
- Go to a campaign or ad group
- Change the time range to be at least 30 days
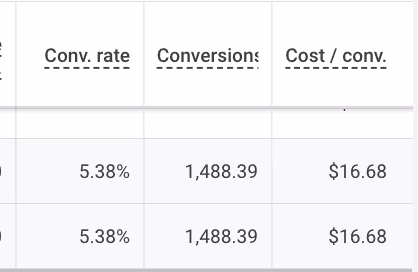
- Take note of the average CPA for the campaign/ad group by scrolling down to bottom and looking at Cost / conv.
- Click Assets > Assets in left-nav.
- Make note of the average CPA for the extension types by scrolling down to bottom and looking at Cost / conv.
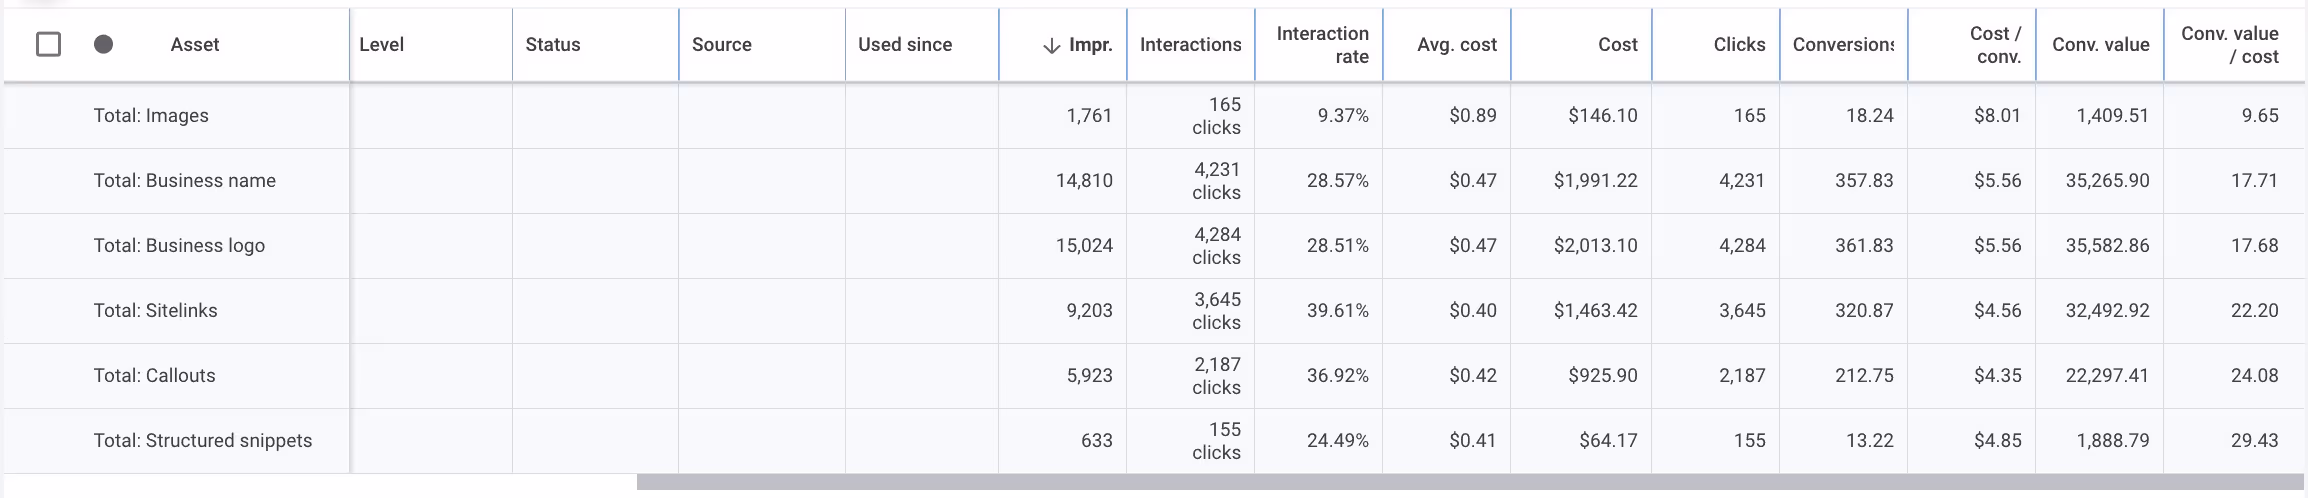
- Pick an Asset type. E.g., Callout. (If it’s overwhelming to look at all your assets at once.)

- Remove any obvious poor performers (CPA much higher, CTR much lower)
- Identify top performers and come up with variations of these top performers and add them to the campaign/ad group directly.
- Repeat for all other asset types you have running.
- Repeat for all other campaigns/ad groups.
Phase 5: Audiences
When: Every month.
Optimize audiences (demographics, locations, ad schedules) to focus on high-performing segments while excluding underperformers. Use Google’s automation for efficiency.
Procedure
- Select an ad group or campaign (use campaigns for locations, ad groups for demographics).
- Set the time range to at least 30 days.
- Navigate to Audiences, Locations, or Ad Schedule in the sidebar.
- Analyze performance using CPA, conversions, or ROAS.
- With automated bidding (e.g., Target CPA, Target ROAS):
- Let Google optimize bids dynamically—don’t manually adjust.
- Pause or exclude segments consistently exceeding your target CPA (e.g., locations or demographics with no conversions after spending 2–3x your target CPA).
- Use segmentation to identify trends (e.g., 25–54-year-olds in California convert best).
- If performance varies drastically (e.g., women 25–34 convert 50% better), consider breaking into separate campaigns or ad groups for greater control over budgets, keywords, and ad copy.
- Repeat for all ad groups/campaigns.
Phase 6: Devices
When: Every month.
Optimize device performance, considering website usability if one device underperforms (e.g., tablets or mobiles).
Procedure
- Select an ad group.
- Set the time range to at least 30 days.
- Click Insights and report > When and where ads showed in the sidebar.
- Review performance (CPA, conversions, ROAS) for desktops, mobiles, and tablets.
- If a device (e.g., tablets) performs significantly worse, test your landing page on that device:
- Check usability (e.g., mobile responsiveness, load speed).
- Suggest improvements to your team (e.g., optimize for smaller screens, fix navigation).
- If usability isn’t the issue, optimize normally:
- With automated bidding, let Google optimize bids—pause devices exceeding your target CPA after sufficient data keeping in mind you're significantly reducing your total market.
Phase 7: Ad groups
When: Check every time. But do this as a last resort.
If search terms, keywords, ads, and targeting are optimized but an ad group still underperforms, consider pausing it.
- Review ad group performance (CPA, conversions, ROAS) over 30+ days.
- Pause ad groups with:
- CPA > target (e.g., >$100 if your target is $50).
- 0 conversions after spending 2–3x your target CPA (e.g., $150 spent).
- Create new landing pages for high-performing ad groups to boost relevance and Quality Score, then monitor performance.
- Try to determine if there's other ad groups you can launch that you're currently not targeting.
Again, this should be a last resort and only if all keywords are underperforming in an ad group.
Phase 8: Campaigns
When: Check every time, but do as last resort.
If all ad groups fail or you want to prioritize better-performing campaigns, pause the underperforming campaign.
- Review campaign performance (CPA, conversions, ROAS) over 30+ days.
- Pause campaigns with:
- Consistent CPA > target (e.g., >$100 if your target is $50).
- 0 conversions after spending 2–3x your target CPA (e.g., $1,500 spent on a $500/day budget).
- Focus budget on profitable campaigns and scale with Performance Max for broader reach once Search proves viable.
Phase 9: Budgets
Okay, now that you've optimized all the things, here's how to scale your budgets over time.
1. Confirm profitability and stability (30–60 days)
- Ensure your initial campaign(s) meets your success metric (e.g., $50 CPA, 300% ROAS).
- Verify consistent performance across ad groups, keywords, and segments
- Use the Campaigns, Ad Groups, and Keywords reports to confirm 50+ conversions per campaign over 30 days, ensuring Google’s machine learning has stabilized.
2. Increase budget incrementally (20–50% at a time)
- Rule: Increase your daily or monthly budget by 20–50% every 14–30 days, depending on performance.
- Example: If your initial budget is $3,000/month ($100/day), scale to $3,600–$4,500/month ($120–$150/day) after 30 days of profitability (e.g., CPA $45, ROAS 350%).
- Avoid exceeding 50% at once to prevent overspending on untested segments—monitor CPA and ROAS closely.
- When to pause: If CPA spikes >20% above target (e.g., >$60 for a $50 target) or ROAS drops >20% (e.g., <240% for a 300% goal) after scaling, pause the increase, analyze performance (e.g., Search Terms, devices), and refine (e.g., add negative keywords, adjust targeting).
3. Expand targeting strategically
- Locations: Add new high-potential locations (e.g., Texas, Florida) after proving profitability in key markets (e.g., California). Start with 1–2 new states/provinces/countries, scaling 20–50% of budget there, and monitor for 30 days.
- Example: If California performs at $40 CPA, test Texas with 25% of your budget ($25/day of $100/day), pausing if CPA exceeds $60.
- Audiences: Expand to similar or in-market audiences (e.g., “Home & Garden,” “Home Improvement Enthusiasts”) after proving success with website visitors or converters. Use “Observation” mode initially, then switch to “Targeting” if performance holds.
4. Test new campaign types (e.g., Performance Max)
- Rule: After 60+ days of profitable Search campaigns, allocate 20–30% of your budget to a Performance Max campaign to scale across Search, Display, YouTube, and Discover.
- Example: With a $5,000/month Search budget, launch a Performance Max campaign with $1,000–$1,500/month, targeting the same high-intent audience (e.g., landscaping) and monitoring for 30 days.
- When to scale: If Performance Max achieves CPA ≤ target and ROAS ≥ goal, increase its budget by 20–50% monthly, up to 50% of total spend, while maintaining Search profitability.
5. Monitor payback period and ROI
- Rule: Scale only if your payback period (time to recoup ad spend via revenue) is within a timeframe to support your scaling.
- Example: If each $50 CPA conversion yields $500 revenue in 30 days, scale confidently—your ROAS is 1,000%, and payback is immediate.
- If instead, your $500 CPA gives you $1000 in one year, that could get quite expensive to support scaling over time.
- Pause if unprofitable: If payback exceeds your target (e.g., >60 days), pause scaling, optimize (e.g., pause underperforming locations, refine Broad Match), and reassess after 30 days.
6. Cap scaling at sustainable levels
- Rule: Limit total monthly spend to 2–3x your initial test budget ($4,000–$15,000/month) until you confirm long-term profitability (e.g., 90+ days of consistent ROAS >300%, CPA <$50).
- Example: From a $5,000 test budget, scale to $10,000–$15,000/month over 3–6 months, monitoring CPA and ROAS monthly.
- Reassess regularly: Review performance quarterly, adjusting budgets, targeting, and campaign types based on ROI and market changes.
Tips for startups
- Start small: With a $2,000–$5,000 budget, test 1–2 campaigns with 3–5 ad groups targeting high-intent Broad Match keywords (e.g., “landscaping services,” “landscaper near me”).
- Leverage automation: Use Smart Bidding from day one—avoid manual strategies like Manual CPC, which are outdated for most accounts.
- Wait for data: Allow 30–60 days (or 50+ conversions/campaign) before major changes. Google needs time to learn and optimize with Broad Match.
- Focus on high-intent segments: Prioritize locations, devices, and audiences driving conversions, avoiding low-intent or irrelevant traffic by refining Broad Match with negative keywords.