Conversation


🥳 Feedback Received!
Thanks for taking a moment to share your thoughts — it genuinely helps us make each chapter sharper.
What happens next:
- Your feedback goes straight to our product team.
- We’ll use it to refine lessons, clarify examples, and make the program even more useful.
Appreciate you helping make this program better for everyone.
Ready for your next challenge? 👇
Project: UTM Tags
What you’ll do
- Add UTM tags to your Google Ads using tracking templates
- Create custom parameters to use in your tracking templates
Introduction
Unlike other ad channels, which require manual entry of UTM tags for every ad, Google Ads lets you create a tracking template that automatically fills UTM tags and attaches them, along with other query parameters, to your ad URLs.
This saves significant time and hassle for startups managing multiple campaigns.
With tracking templates, you set the template once, and Google Ads automatically fills in values for source, medium, campaign, content, term, and any other query parameters you specify for every ad it displays.
In this lesson, we’ll cover how to set up tracking templates and how best to customize them to meet your startup’s needs.
Auto-tagging
Google Ads automatically tags your ad URLs with a gclid (Google Click ID) parameter. This gclid tells Google Analytics and other Google products everything they need to track users, such as the source, medium, campaign, content, and term, without requiring manual UTM tags. When a user clicks an ad, the URL might look like this: https://www.demandcurve.com/?gclid=123456789.
While the gclid is designed to simplify tracking within Google ecosystems, it doesn’t eliminate the need for UTM tags. The gclid data is only available to Google products like Google Analytics, meaning non-Google tools (e.g., Mixpanel, Amplitude, Hotjar) can’t use this information. Therefore, you should still add UTM tags to your Google Ads URLs using tracking templates to ensure comprehensive tracking across all your analytics platforms.
Tracking templates don’t overwrite the gclid, so you’ll still see the default UTM values in Google Analytics, even with a tracking template set.
The default UTM values for Google Ads are:
- Source: Google
- Medium: CPC (for Search campaigns; can vary as display, video, or shopping for other campaign types)
- Campaign: the Google Ads campaign name
- Term: the keyword that triggered the ad
- Content: the ad ID
For startups, we recommend being specific with the medium and setting it as search, display, youtube, or shopping for different Google Ads campaign types. Being specific allows you to better group and analyze the performance of each campaign type. However, you can choose to leave the medium as CPC if you want to keep things simple and consolidate data.
Tracking templates
Hierarchy
You can apply tracking templates at the account, campaign, ad group, or ad level in Google Ads. Any tracking template applied at a lower level overwrites one at a higher level. For example, a campaign-level template overwrites an account-level template, an ad group-level template overwrites a campaign-level one, and so on.
When setting up a new Google Ads account for a startup, we always create a tracking template for the entire account as a default, typically for Search campaigns, since they often make up the bulk of traffic and campaigns. For any campaign or ad group that doesn’t follow this format (e.g., Display, YouTube, or Shopping campaigns), we overwrite it with a different tracking template to ensure the utm_medium reflects the correct campaign type (e.g., display, youtube, shopping).
Variables in tracking templates
Tracking templates let you set both static values and dynamic variables. Static values remain constant, while dynamic variables (called ValueTrack parameters) are automatically filled by Google Ads when an ad is displayed.
Here’s a basic tracking template example:
{lpurl}?utm_source=google&utm_medium=search&utm_campaign={campaignid}&utm_term={keyword}&utm_content={creative}
This will look like this in Google Ads:
Note:
- Anything within curly brackets (e.g., {lpurl}, {campaignid}) is a ValueTrack parameter that Google dynamically fills based on the ad’s context.
- Everything else (e.g., utm_source=google, utm_medium=search) is statically defined and remains the same.
Google automatically provides these ValueTrack parameters:
- {lpurl}: The URL of your landing page (always include this to ensure ads link correctly; without it, ad links will break).
- {campaignid}: The 10-digit ID of the campaign (e.g., 1543683531; viewable in Google Ads under the “Campaign ID” column in Attributes).

- {keyword}: The keyword that triggered the ad.
- {creative}: The ID of the ad (not user-friendly, but available for tracking).
One challenge is that you can’t use the name of the ad, campaign, or ad group directly—only their IDs, which can be confusing for someone reviewing analytics (e.g., seeing utm_campaign=513216432 without knowing the actual campaign name).
To address this, you can create custom parameters in Google Ads to insert human-readable names.
Custom parameters
A custom parameter is inserted using curly brackets, always starting with an underscore (e.g., {_stcam}, {_stadg}). By convention, they often start with “st” (e.g., _stcam for campaign, _stadg for ad group), but this isn’t mandatory—startups can use any prefix (e.g., _myparam).
Here’s an example tracking template using custom parameters:
{lpurl}?utm_source=google&utm_medium=search&utm_campaign={_stcam}_{_stadg}&utm_term={keyword}&utm_content={creative}
In this format, utm_campaign combines the campaign name ({_stcam}) and ad group name ({_stadg}) for more detailed tracking, such as [CampaignName]_[AdGroupName]. This provides clearer insights into where users are coming from in your analytics tools.
This is what it will look like in Google Ads:

Note on {creative}: The {creative} parameter refers to the ad ID, which isn’t user-friendly (e.g., a numeric ID like 12345). While you could create another custom parameter (e.g., {_stad} for ad name), this requires manual setup for each ad and is often less useful or practical for startups. We typically recommend focusing on campaign and ad group names for simplicity, but you’re welcome to add ad-specific custom parameters if needed.
Phase 1: Create custom parameters
- In Google Ads, navigate to the campaign or ad group settings under “URL options” or “Tracking,” and add custom parameters in the “Custom parameters” section. Define {_stcam} as the campaign name and {_stadg}as the ad group name, ensuring they’re manually set or dynamically pulled from your campaign structure.
- You can't put a space into a URL normally, so make sure you’ve encoded your campaign name (see Google Ads – Additional Resources > Search Ads: URL Encoding)
- You can also use the Google Ads Editor or API to manage custom parameters efficiently, reducing manual effort for startups.
Phase 2: Setting tracking templates
Now that we have the custom parameters in place, let’s learn how to add the tracking template both at the account level and at lower levels.
Account
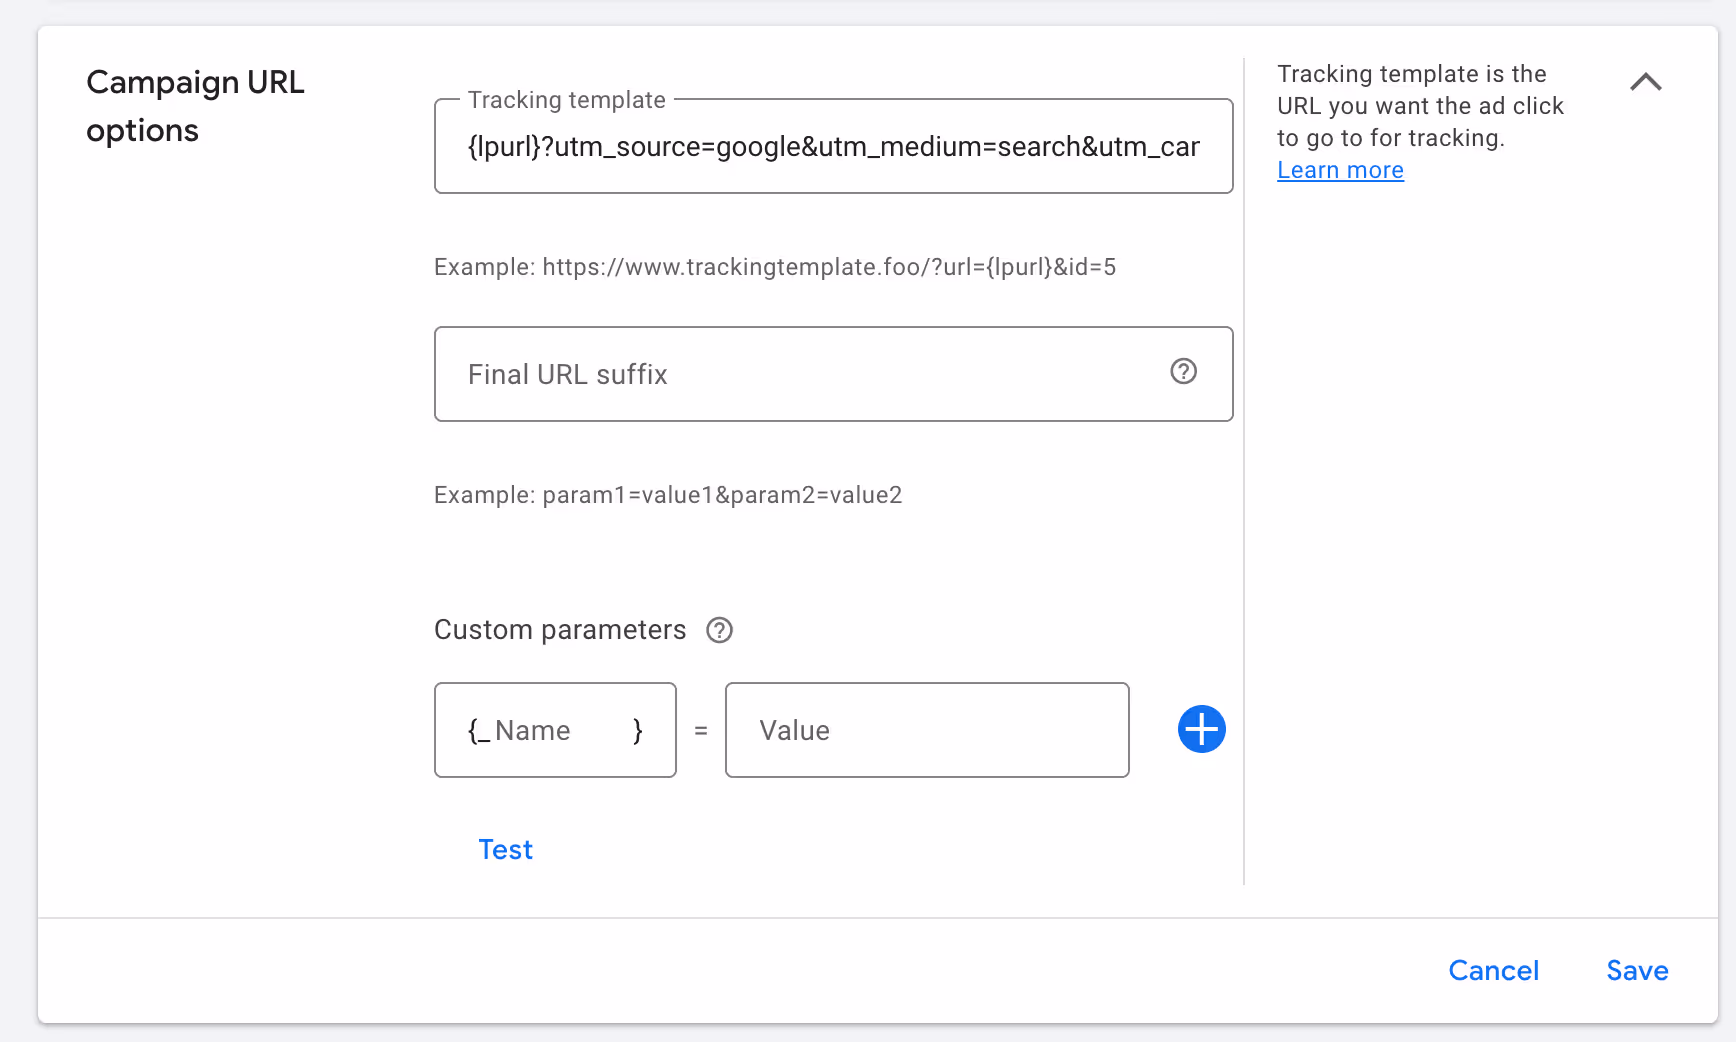
- Click Settings in the sidebar
- Click Account Settings
- Expand Tracking
- Paste this code in the template
- {lpurl}?utm_source=google&utm_medium=search&utm_campaign={_stcam}_{_stadg}&utm_term={keyword}&utm_content={creative}
5. Click Test and see the URLs that pop up. Click on one to make sure it goes where you want and looks how you want. Make sure the right words pop up in the URL.
6. Click Save
The tracking template above is for Search campaigns. You will need to customize it for Display, Shopping, and YouTube campaigns by changing the utm_medium to display, shopping, and YouTube when you set the tracking template at the campaign level.
Also remember that Google gives you the lpurl, keyword, and creative — so you don’t have to set those up.
Campaign/Ad Group
You only need to do this if you want to overwrite the URLs you set on the account. For example, if you want to change the utm_medium to display for a Display campaign.
Adding a tracking template to a campaign or ad group is similar to adding a custom parameter. Follow the steps to set a custom parameter from Phase 1, but add the Tracking template column instead, and paste in the following code:
{lpurl}?utm_source=google&utm_medium=search&utm_campaign={_stcam}_{_stadg}&utm_term={keyword}&utm_content={creative}
Make sure to customize the utm_medium based on the actual campaign type (display vs shopping vs YouTube).