
Mobile Apps
Ignore this reading if you're not a mobile app company.
What you’ll learn
- How to set up and structure your mobile app tracking
- What’s different about mobile app tracking
- The tools you need to make tracking work
Introduction
If you’re not familiar with some of the words in here (especially around ad channels), that’s OK. It’s going to feel a lot more tangible in the project.
It's a lot harder to track conversions on a mobile app than on a website. Here’s why:
- Instead of being on your website, the user is in your mobile app. That's a totally different codebase and browser.
- There’s a totally new site in between your website and your mobile app: the App Store or the Play Store page. Any tracking you have gets lost when they hit one of the stores.
- People may visit your landing page on their desktop computer. Then, they’ll jump to their phone to actually download and use your app. It’s easy to lose track of them between devices.
There are solutions to these problems. You have to spend more money and spend time configuring things — but you'll be able to track conversions better. It's worth it in the long run.
Mobile App Attribution Platforms (MAAPs)
MAAP’s let you track people from the ad channel, to your site, on the App/Play Stores, and throughout your mobile app.
Say you’re in charge of a mobile app that sells furniture. Someone clicks an ad on Instagram, which takes them to the Apple App Store. They download the app, install it, and then buy a chair on it.
If you’ve set up your MAAP correctly, you can tell that the same person clicked the ad, installed your app, and bought a chair.
Without the MAAP, it would look like different people did each step. In fact, you likely can't track those steps at all.
How can MAAPs do this?
MAAPs have a special agreement with the App and Play Stores that allows them to pass the right data around. You can't code this yourself.
Recommended MAAPs
We recommend AppsFlyer to clients. We’ll walk through using it in the project for this module.
Other MAAP’s include Adjust, Branch, Kochava, Tune, and more.
Screenshot: a correctly set up MAAP
Here's what a MAAP can look like when it's set up correctly.
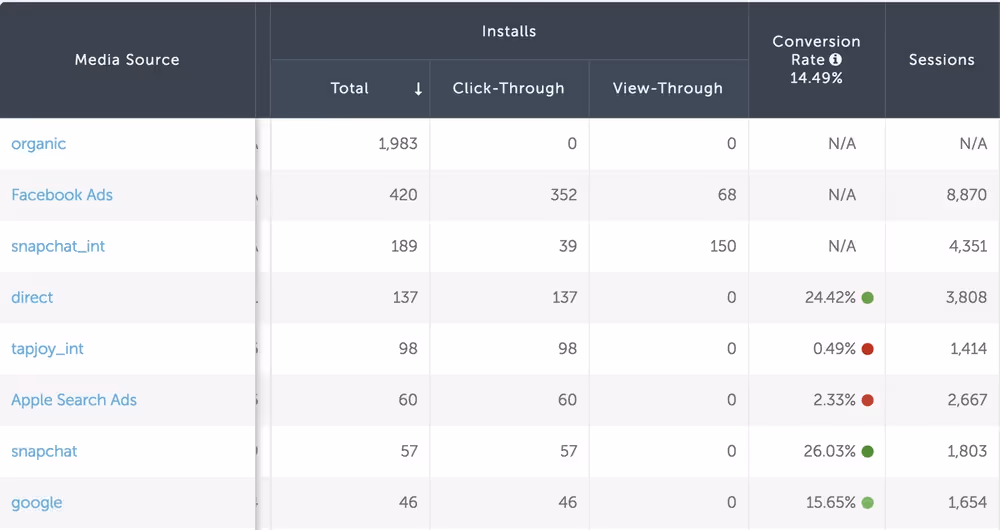
You’ll be able to see exactly how each traffic source is performing — whether it’s organic (from people googling you), referral (people sharing posts on Facebook), Facebook ads, Google Ads, or any other traffic source.
So, whenever someone installs the app or triggers an event (e.g., buys a chair) after clicking one of these ads, the MAAP will know.
Without knowing that these events happened, you have no way of knowing which ad channels are working. Which means you might throw money down the drain.
Checkpoint
We recommend starting the projects now.
Then, come back to this reading if you get stuck in the mobile app project. There's too much to read and remember otherwise.
But if you really want some bedtime reading, read on!
Technical hurdles
Hopefully, you now see the benefits of using MAAPs. The tricky part is setting them up. There are a few hurdles.
Technical Hurdle 1: Dealing with landing pages
If someone hits your landing page before they visit the app store, it's hard to track conversions. The app store removes all the tracking.
To fix this, you use the MAAP to create unique URLs for each traffic source.
For example, https://bellcurve.onelink.me/3Eg9 would be a link to the Apple App Store, specifically for people who come from Facebook.
https://bellcurve.onelink.me/4Fa2 would be a link to the Google Play store, specifically for people who come from Quora. And so on.
In AppsFlyer, this weird-looking link is called the OneLink.
Technical Hack
The OneLink URL looks super ugly. And to a user, it looks downright spammy.
You can mask the spammy-looking link by asking your engineer to point your CTA at a clean-looking URL (e.g., at https://bellcurve.com/download-app), but have the Javascript actually send the user to the OneLink URL when they click the CTA button.
If this doesn't make sense, you can literally copy the above paragraph and send it to an engineer. They'll get it.
Technical Hurdle 2: Passing Data to Ad Channels
Facebook won't know that someone bought a chair on your mobile app; the ad channel doesn't receive conversion data.
That data will only live the MAAP itself. Until you do some extra work.
To send data to your ad channel, you’ll need your engineers to install the special code that Facebook/Google Ads/etc. gives you inside your app. This code is called the "SDK".
We’ll cover the instructions you should give them in the project.
If you don’t install this code…the ad channels won’t optimize towards a conversion goal that you care about.
What does this mean?
Let's take Facebook ads. Facebook automatically shows the ads that perform best. But what does "best" mean? Ideally, "best" means showing ads that lead to people buying on your site.
Not clicking on the ad. Not adding to their cart. Not liking your post. Buying on your site.
Without the SDK, you can't send downfunnel conversion data (such as installs and purchases) to the ad channels you’re running.
So, Facebook will show the ads that lead to worse “proxy” metrics, such as the number of clicks on your ad — because it can see that data.
That’s not ideal. Someone who clicks a button won’t necessarily become a loyal, paying user.
Technical Hurdle 3: Passing UserData to Ad Channels
Even if you install the SDK, you still have to do some extra work to tie individual users to a conversion.
For example, Facebook can now tell that someone bought a chair. But it doesn't know that Hannah Sornson from Kansas bought the chair -- because she's not logged into Facebook on your app.
In order to know that Hannah bought the chair, we have to use a couple hacks.
These hacks are not-so-good solutions. Both of them mean you have to kick the user out of your app, which is not a great experience. Sucks, we know.
Here are your options:
Preferred Solution
Redirect the user to your a “thank you” page on your website after they convert in your app. This page will have the right tracking pixels on it, so the ad channel can receive the conversion data.
To make the page useful to the user, you can link to helpful articles or tutorials they'll need after they purchase.
Alternative Solution
Put the purchase form on your website (instead of in the app) and use the ad channel tracking pixels there.
In this case, the MAAP won’t receive the data — since the purchase happened outside of the app — so you'll have to send it the data separately.
You may have to use the MAAP to see if your campaigns are converting
If you don’t use one of the strategies above, you’ll have to rely on the data in the MAAP itself. You’ll struggle when you run ads because you can’t track your goal.
It’ll also be harder to take advantage of the full suite of data that the ad channel has. For example, you won’t be able to figure out that people in Ohio tend to buy from you more often than people in Florida — which would teach you to run more ads to people in Ohio.
Why? When you pass data into the MAAP, you can only pass along a few pieces of information: the source, the campaign name, the adset name, ad names, and keywords. There won’t be any extra information that your ad channel would give you, like the user’s location, age, gender, parental status, household income, and more. The ad channels often have this data, but AppsFlyer won’t.
As a workaround, you can break these different audience segments out into separate campaigns and adsets in order to properly track them at these more granular levels. So, for example, to see how Google Ads audiences perform across a few different geographies, you could break your “Dog Food” campaign into different, geography-specific campaigns:
- Dog Food – USA
- Dog Food – Canada
- Dog Food – UK
- Dog Food – Europe
- Dog Food – Asia
- etc
Then you’d have different UTM tags for the ads in these campaigns (utm_campaign=brand-usa, for example), which then lead to different MAAP URL’s, which then update the MAAP with the different campaigns.
It’s a lot more work when you set up your campaigns, but this approach will give you better data in your MAAP. You won’t need to boot your users out of the app just to have better tracking in your ad platform. We think it’s the best compromise.
Technical Hurdle 4: Passing through UTM Tags
Your site will need to take your site visitor’s UTM tags and append them to the OneLink.
Like this:
https://fictitiousdogfood.onelink.me/3Eg9/?pid=google_search&c=Dog-Food&af_adset=Organic&af_keywords=best+organic+dog+food&af_ad=the-best-organic-dog-food
We’ll give you the template for the code snippet in the project, but you’ll need to know how it works so you can structure your UTM tags and campaigns the right way.
With the AppsFlyer OneLink, you can pass many kinds of data, including source, campaign, adset, ad, keywords, and more. They work just like UTM tags, but have different names. We’ll want to connect our UTM tags to these values. Here's a table with the most important ones, and how they map to UTM tags.
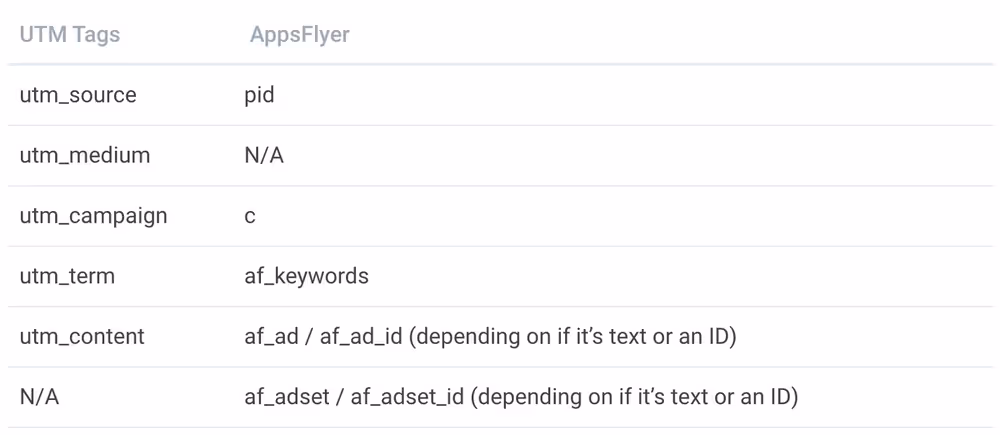
Since AppsFlyer doesn’t have a utm_medium equivalent, you'll need to combine the utm_source and utm_medium tags together into AppsFlyer’s pid tag in this format: [utm_source]_[utm_medium]
For example, pid=facebook_prospecting
Google example
Say someone hits Fictitious Dog Food's landing page with the following URL (broken out):
https://www.fictitiousdogfood.com/?utm_source=google&utm_medium=search&utm_campaign=Dog-Food_Organic&utm_term=best+organic+dog+food&utm_content=the-best-organic-dog-food
We would change the OneLink to look like this:
https://fictitiousdogfood.onelink.me/3Eg9/?pid=google_search&c=Dog-Food&af_adset=Organic&af_keywords=best+organic+dog+food&af_ad=the-best-organic-dog-food
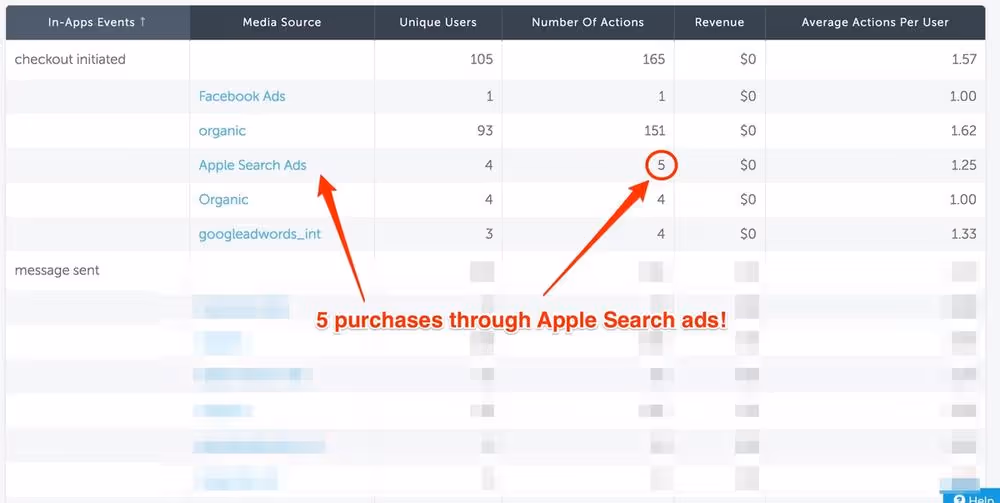
When everything is installed and configured, you’ll find this data in the AppsFlyer dashboard and see how each source, campaign, adset, ad, and keyword performs for each event you record.
Like this beautiful table:
