
Project: Shopify
Skip this project if your company isn't an eCommerce company.
What you’ll learn
- How to set up tracking for ecommerce platforms like Shopify
- What’s different about ecommerce tracking
- The tools you need to make tracking work for ecommerce
Introduction
Conversion tracking for Shopify is a bit different than if you have a different type of site.
Shopify, and other ecommerce platforms, simplify a lot of things through apps, integrations, and easier-to-use UI’s. But in their simplifications they also make things quite different, so this project will walk you through the nuances of setting up conversion tracking in this different environment.
We use Shopify as the example as its the most popular ecommerce platform currently on the market. If you use another platform, such as Bigcommerce, then the steps are similar, just with a different UI.
Let’s get started.
Phase 1: Add Google Analytics
Google Analytics, like we discussed earlier, is the bread and butter of any analytics and tracking setup.
Luckily, Shopify and other ecommerce platforms have integrations that handle the brunt of installation of Google Analytics. But there are still a few things you need to do.
We’ll use the Shopify GA help page as a guide here. There is a bit of information there, and you can skip most of it if you have a Google Analytics account already, so we’ll tell you what to focus on.
If you haven’t already, you’ll want to add your GA tracking tag. Assuming this isn't in your conversion events doc already, open up GA, then head to Admin > Data Streams > {Your Site}. Copy the Measurement ID in the top-right corner. Then add this ID to your site in your Online store > Preferences.
You’ll also want to make sure that code is not already manually installed into the page in the theme.liquid file (Step 1 of the Shopify guide walks you through that).
Once you’ve installed GA in Preferences and made sure GA isn’t installed manually, you’ll want to follow Step 4: Turn on ecommerce tracking in the Shopify guide.
Ecommerce tracking and the improved Enhanced Ecommerce (which we recommend) will automatically set up events and goals on your site, including product page views, adding to cart, initiating checkout, purchasing, and more.
Phase 2: Add ad channel tracking
In this phase we’ll walk you through how to add tracking for the different ad channels. We’ll be adding to your Conversion Mapping doc as you go along to keep tracking of all the events being tracked and what they mean for each channel.
Most channels will require some coding (so best to involve an engineer in this process).
2a. Facebook
Add your Facebook Pixel ID to Shopify and it’ll automatically track nine different events a user may take on your site.
This includes viewing a product page, searching, adding to cart, initiating checkout, registering, purchasing, and more.
For steps on adding it, and more information on the events it will track, check out Shopify’s Facebook pixel help page.
Make sure to add that list of events to your conversion Mapping doc if you haven’t already.
2b. Google remarketing
If you’re running Google Ads (aka AdWords), and you want it to create audience lists, such as All Site Visitors, or All Customers, or even a list for everyone who purchased in that last 30 days, you’ll need to create a “remarketing tag” and add it to the site.
This is useful for excluding already converted users, and for retargeting visitors who didn’t convert. We highly recommend it.
Add it in by following these steps on Shopify’s help page.
2c. All other channels
Every other channel is more complicated, as the events are spread out in a few different places.
Chat with us if you get confused or stuck.
We strongly recommend you have your engineers do the steps below. Not you.
Purchase conversion
Adding tracking for purchase conversion is different than any other event. Why? Because for Shopify and most other ecommerce platforms, the checkout flow and order confirmations happen on a Shopify hosted site that you don’t really have much control over.
The most you can do is insert HTML (i.e., ad channel conversion pixels) into the order confirmation page through Shopify’s settings.
If you’re adding Google Ads to your site, you can follow these steps to install it.
Otherwise:
- Go to your Shopify admin
- Go to Settings > Checkout
- Scroll down Order processing
- Expand Additional scripts
- Paste in the ad channel pixel into this box.
- Make sure to include the <script> tags
- E.g., to track purchases on Quora, do <script>qp('track', 'Purchase');</script>
- Not qp('track', 'Purchase');
- You can then customize the conversion value by using the built in Shopify variable for the sale price.
- If you don’t want to include shipping and tax, this would be {{ subtotal_price | money_without_currency }}.
- If you do want to include shipping and tax, this would be {{ total_price | money_without_currency }}.
- An example using the Google Ads/AdWords pixel is below (note the ID’s are X’d out):
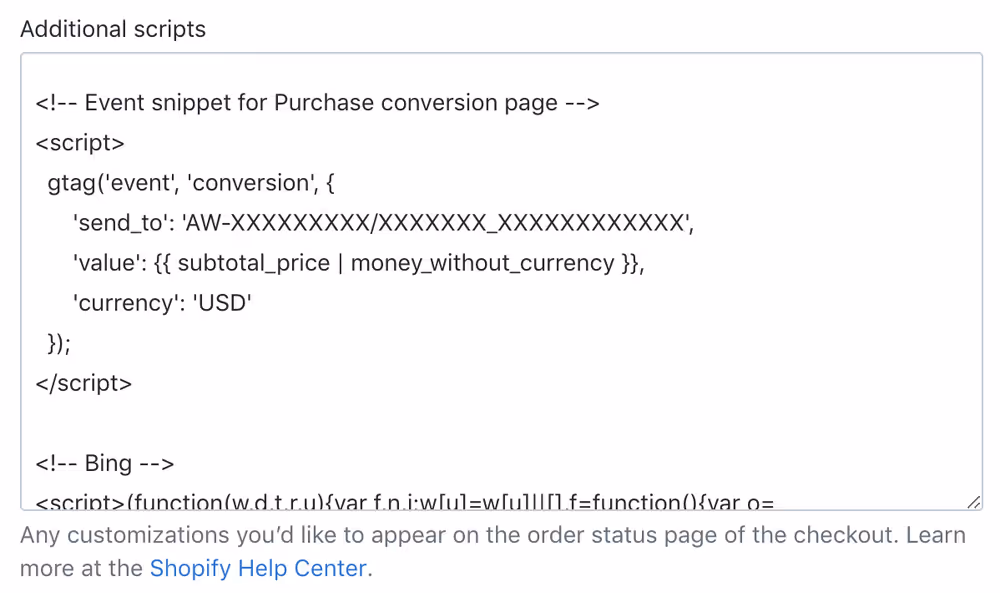
Make sure to add the Purchase event to the Conversion Mapping doc for each new ad channel you set up.
Checkout conversions
Because the checkout conversion events are on Shopify’s site and not your own, you can’t actually track them manually. So you can’t track things like “add shipping info” or “add payment info.” All you can track is when a customer starts checking out (initiate checkout) and when they finish it (purchase).
Subscription purchase
If your product is available on a subscription basis, you might use a third-party Shopify app like Recharge to allow those checkouts to happen. But here’s the catch: these products have checkouts that occur on other sites entirely. Not on Shopify. So you may have to add a conversion pixel with those third-party app settings in Shopify.
All other conversion actions
All other conversion actions are added in through code just like they would be on any other website. Have your engineers add all the remaining events from your analytics proposal.
Phase 3: Verify they’re installed properly
Now that you have everything installed, go into each ad channel and analytics software and verify that all the events are firing as desired.
Log into Google Analytics. And go to Real-Time > Events. Do you see the events in the GA events tab?
Verify that the right events are firing on your other ad channels as well.
Next
Go back to the Conversion Tracking > Overview of Projects and move on to the next step.