
Project: Configure GA and Ad Channels
Prerequisites
This course assumes you already have accounts for Google Analytics and the various ad channels you’ll be testing. If you don’t, make these accounts now (and make sure to add billing information for the ad channels).
- Google Analytics
- The various ad channels you plan to run
- A semi-completed conversion events doc (from Conversion Events > Project: Conversion Events)
Overview
In this project, you’ll:
- Learn the difference between an event and conversion in Google Analytics 4.
- Set up major ad channels to track conversions.
- Fill out your conversion events doc to record how you configured each ad channel.
Make sure to have your conversion events doc open for constant reference. It’s important not to forget or mismatch something. Otherwise, your tracking will be useless!
Phase 1 covers configuring Google Analytics, and Phase 2 covers ad channels.
Phase 1a: Configure Google Analytics 4
GA is the bread and butter of analytics and tracking, predominately because it's free and has many great features. It’s the place where you track all traffic on your site. It also is a backup to the data collected and reported by ad channels.
In 2023, Google made Google Analytics 4 mandatory for all accounts. So we'll be focusing on that.
If you're unsure whether to use GA4 or UA for your marketing stack, see our FAQ: Google Analytics 4. We’ll cover how to configure both versions below.
Phase 1: Set up Google Analytics 4
Creating a GA4 Property
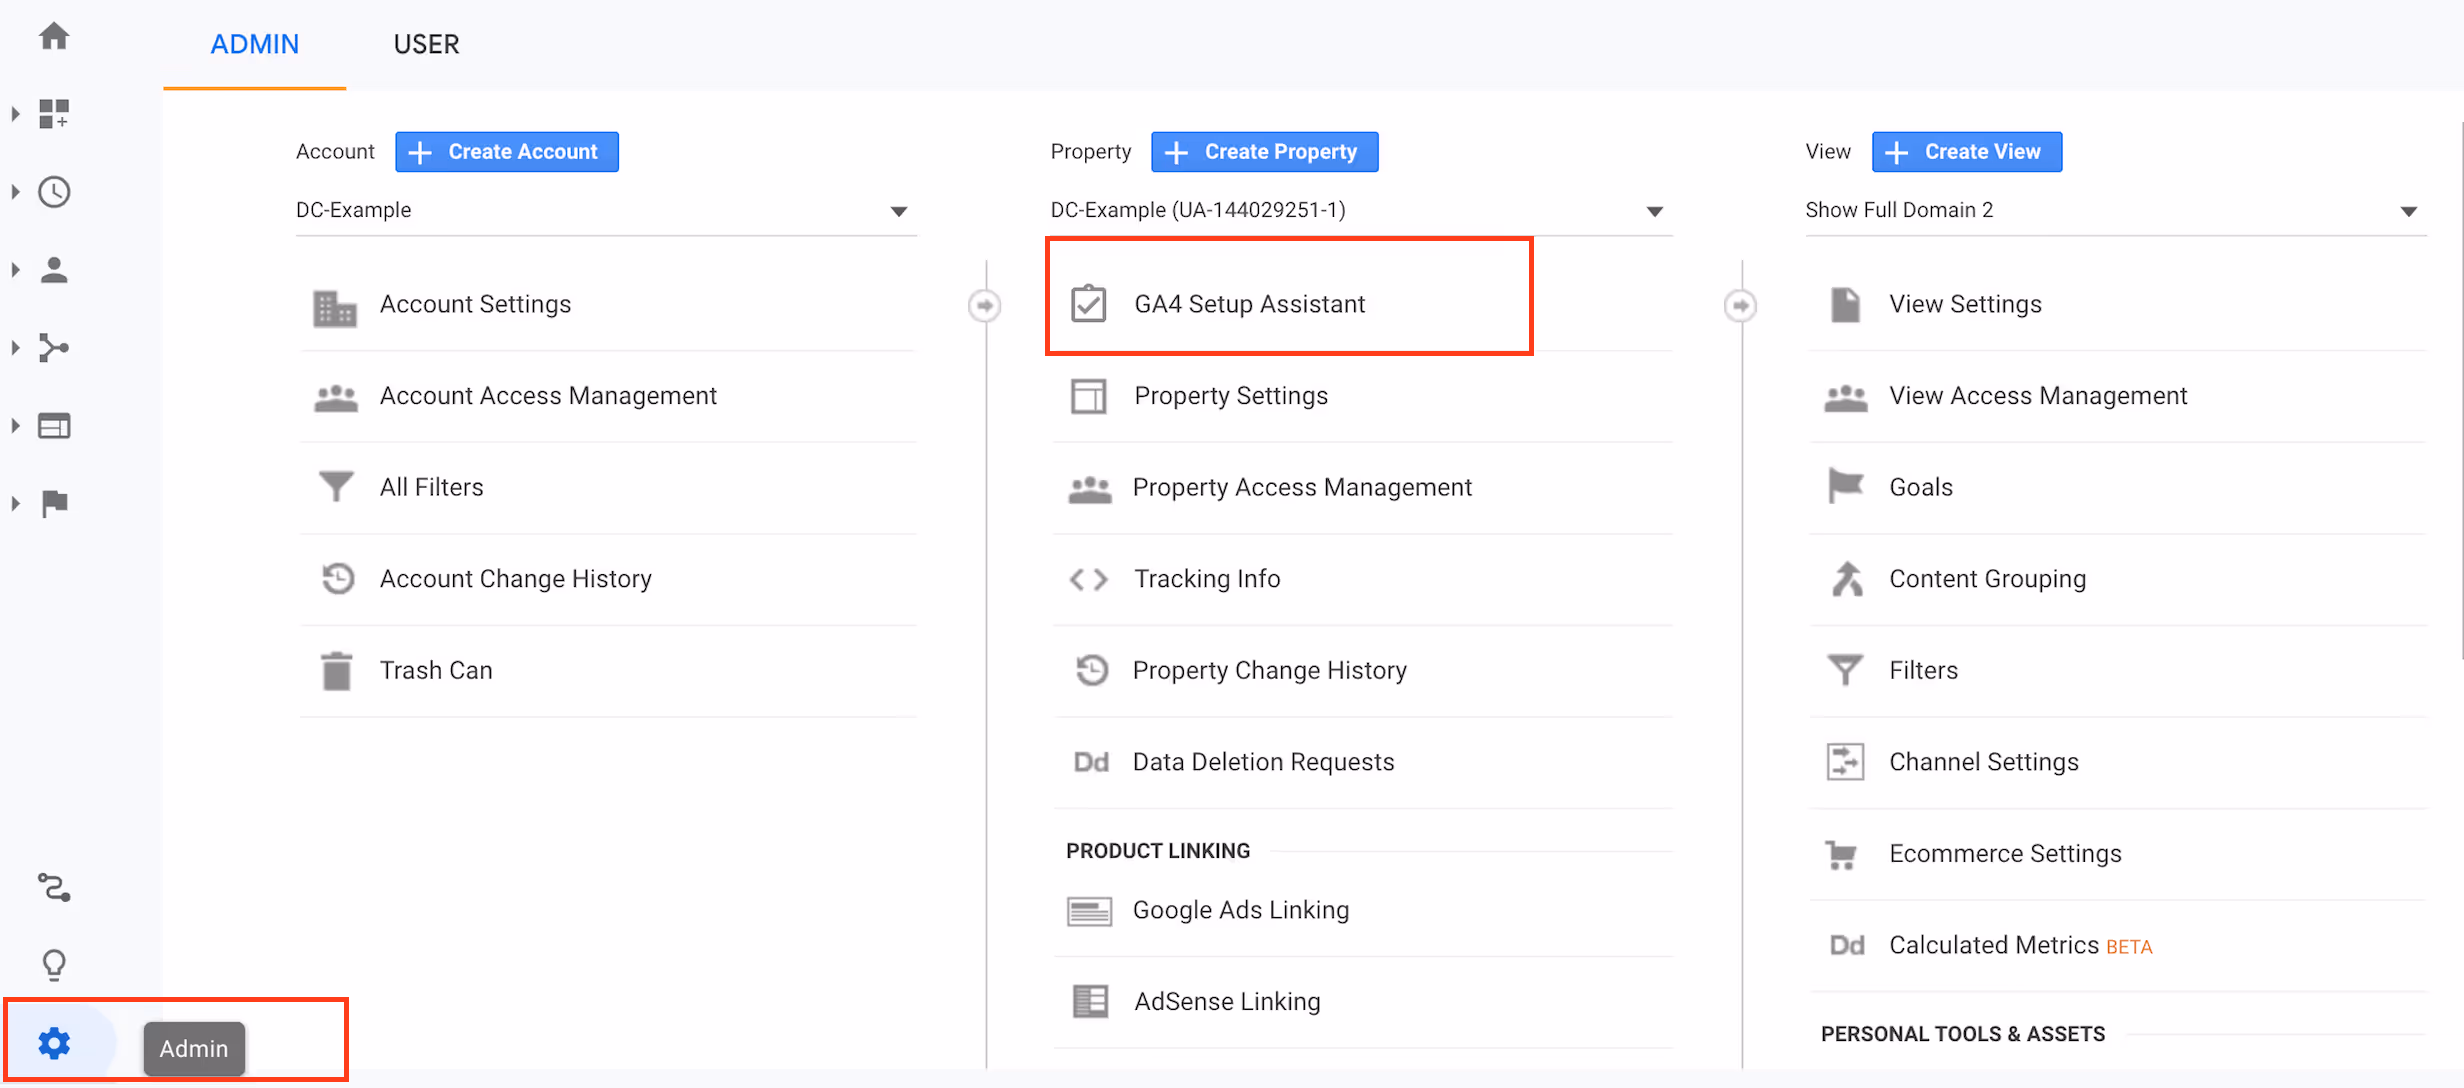
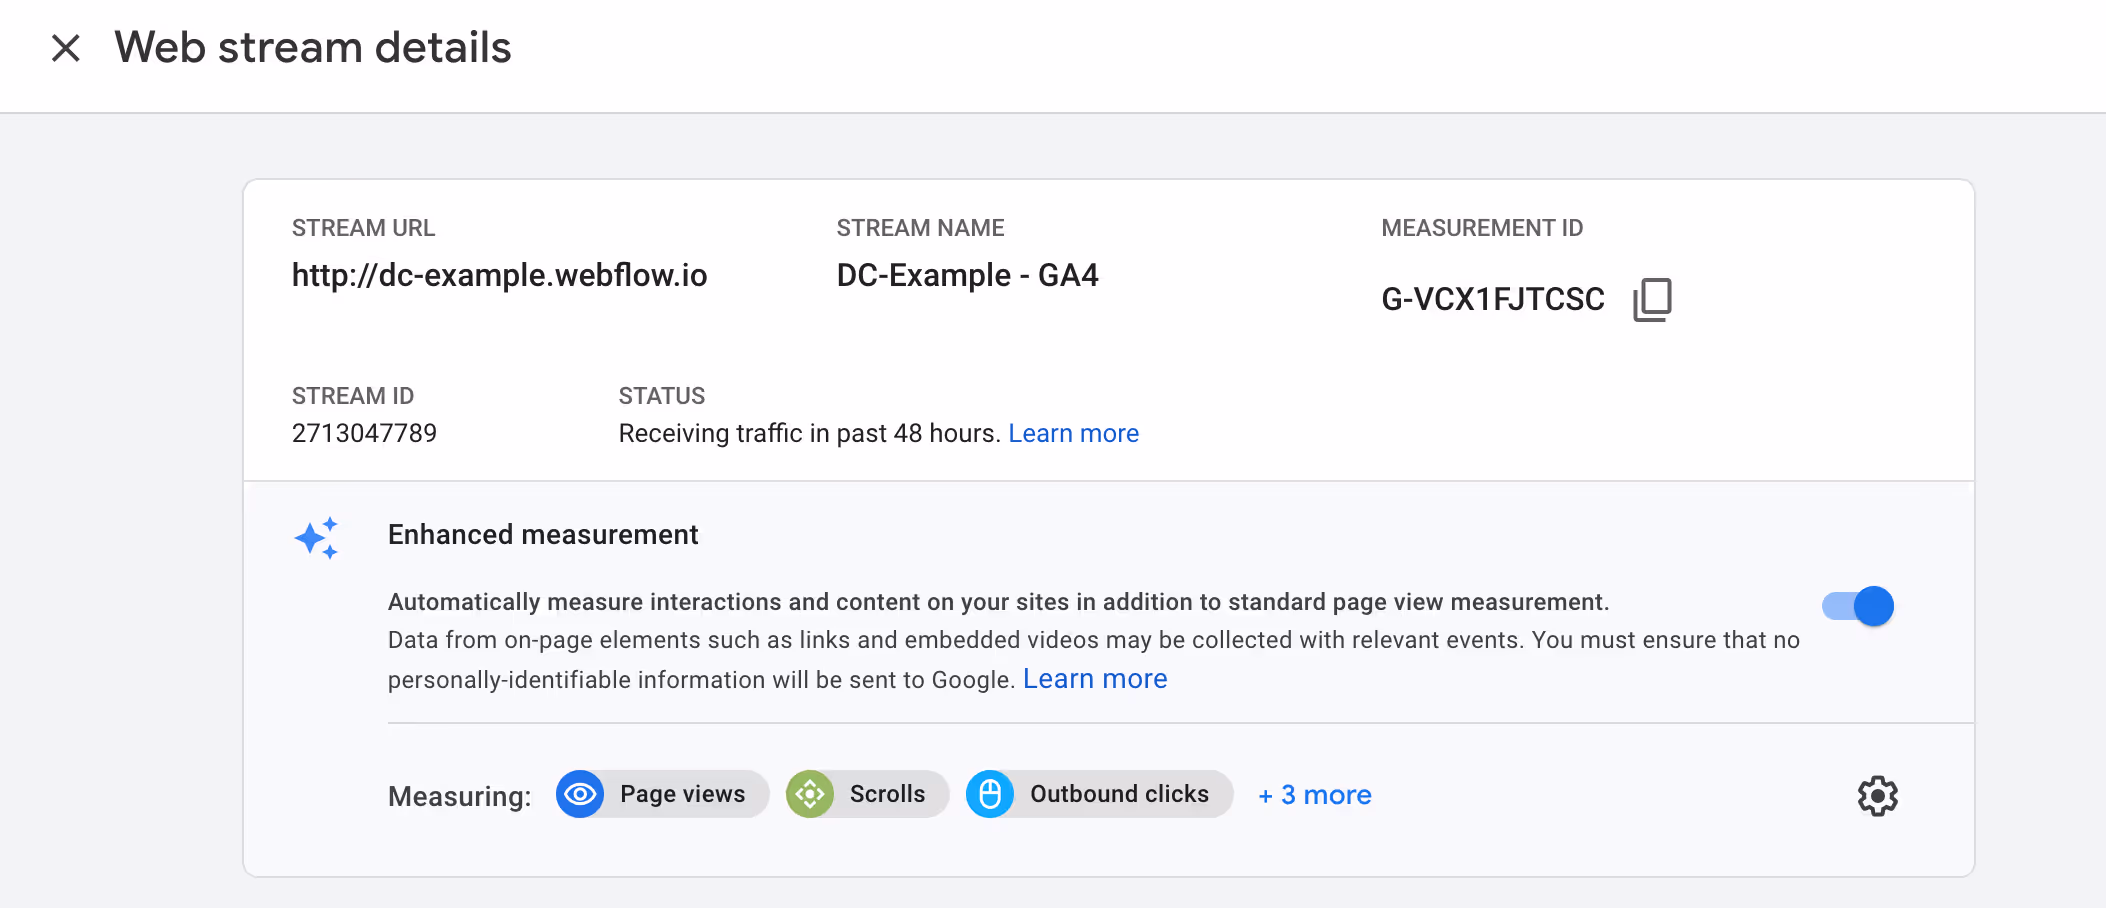
Log into GA, click Admin > GA4 Setup Assistant, and follow the instructions to set up your GA4 property. Make sure to turn on “Enhanced Measurement” to automatically track basic events like page views.
Make a note of your Measurement ID (this can be found in “Data Streams” from the Admin menu) and add it to your Conversion Events Project doc.
Events in GA4
There are three primary ways of creating events in GA4:
- Logging the events in code manually (requires you to add something small to your codebase, which might require the help of an engineer.)
- Configuring them in the GA4 dashboard (too limited)
- Logging the events using tools like Google Tag Manager or Segment
We recommend #3 using Google Tag Manager because it’s something you can set up yourself without requiring an engineering team.
We’ll cover the installation of #3 in Project: GTM. For now, you can keep reading to get an overview idea of how GA4 works.
(If you’d like to read more on implementing #1 or #2, we recommend this excellent article and tutorial.)
Once events are configured, you can find them in Configure > Events menu. The “Mark as conversion” column allows you to define which list events are important. For example, you could mark clicking a signup button as important while leaving a mundane event like viewing a FAQ page un-toggled.
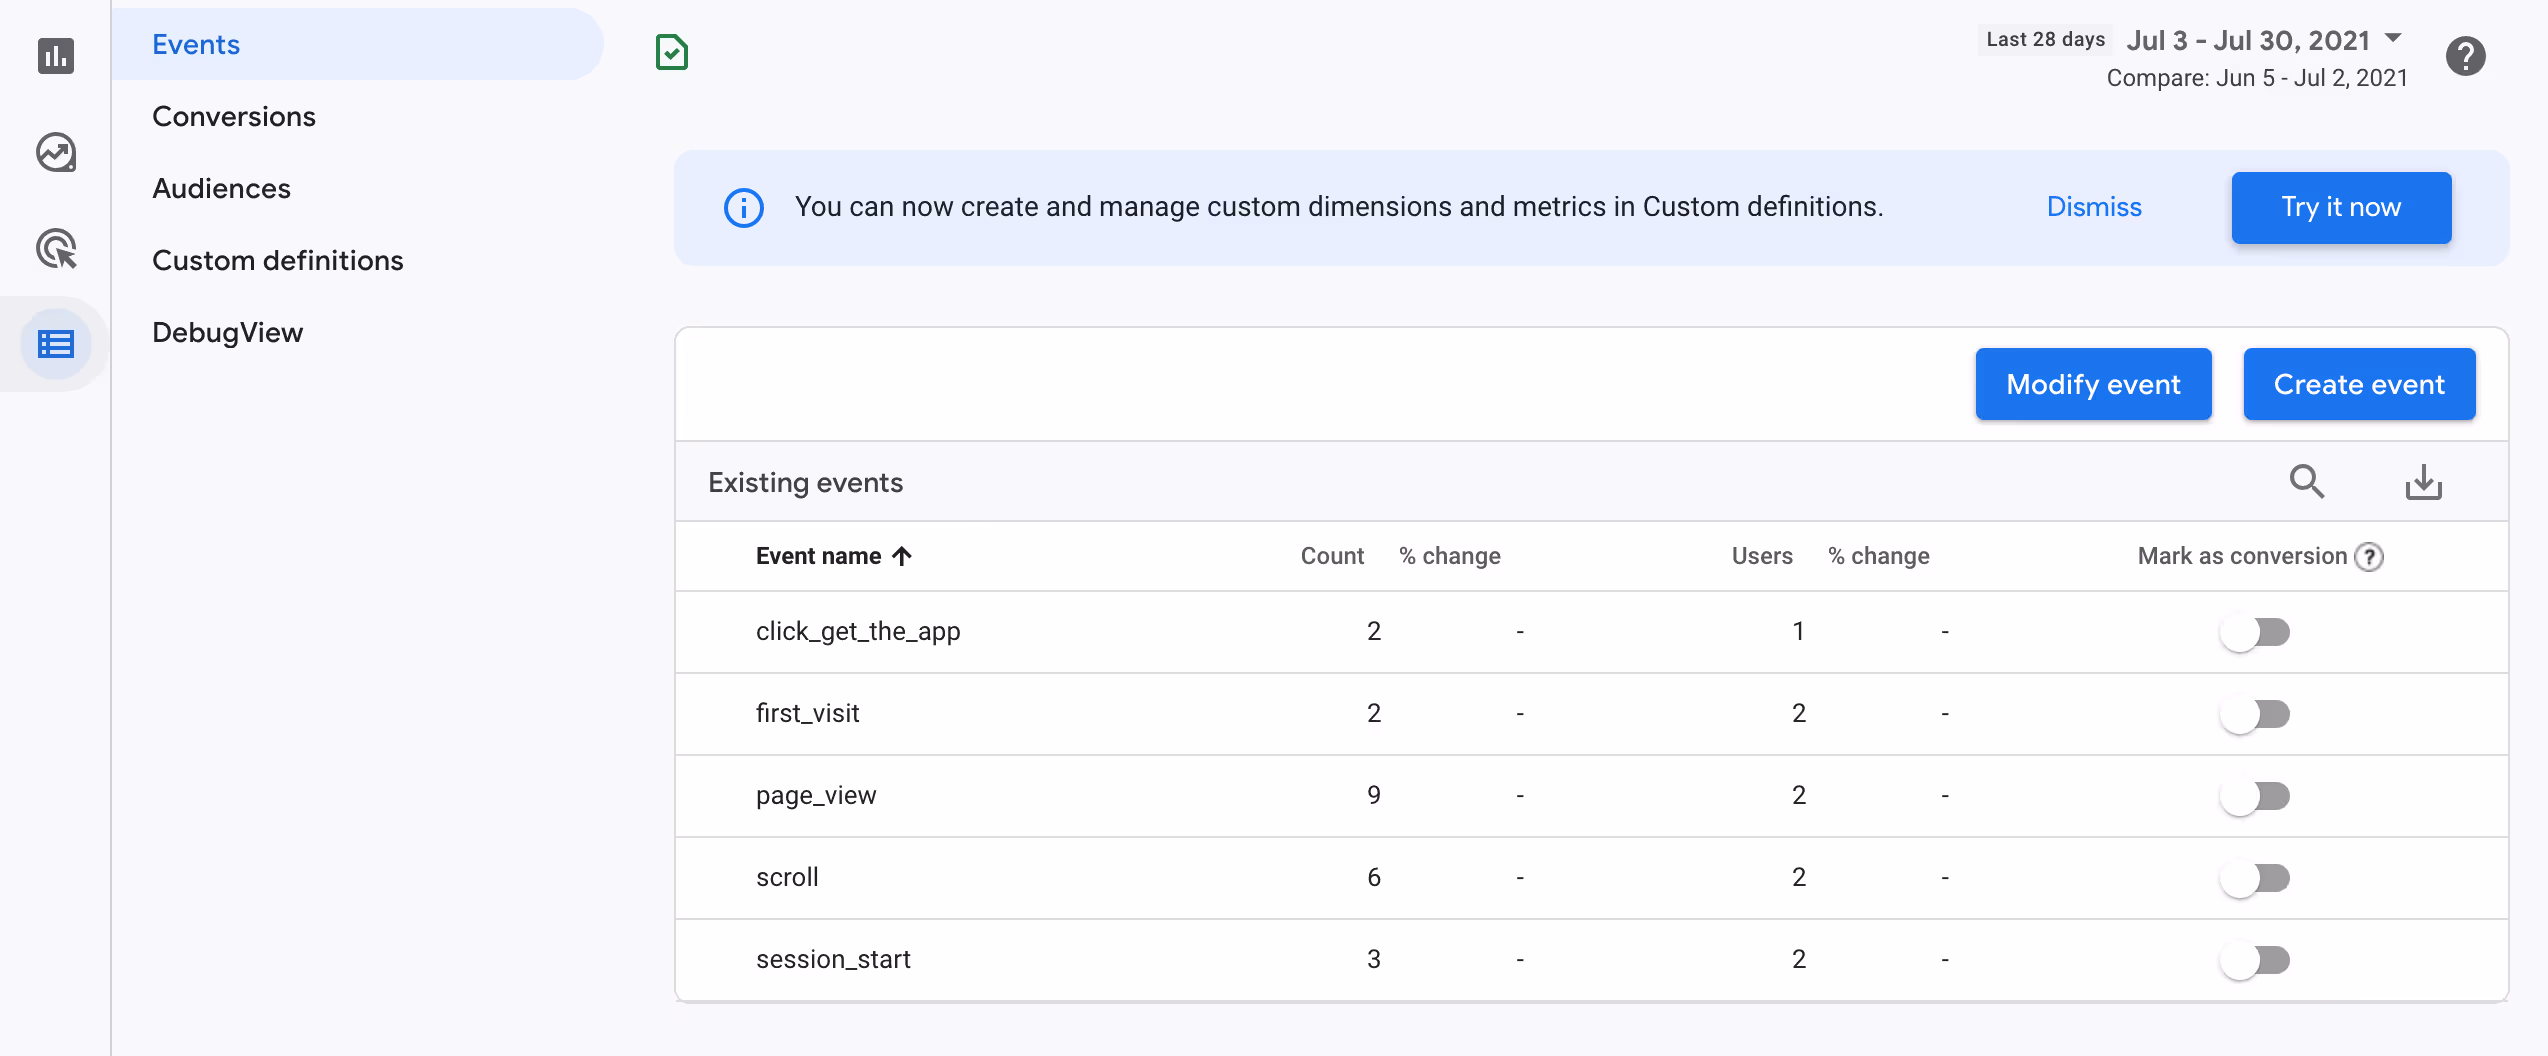
You can break down data throughout GA to see its conversion performance. For example, you can see the total event count, total conversion count, and total revenue generated from conversions and filter it down to specific events/conversions.
Phase 1b: Confirm GA is working
Prerequisite: This assumes you already have GA installed on your site. If you don't, skip this section**.** We'll verify the installation later.
Within the dashboard
Head to Real-Time.
Verify the following:
- Do you see yourself when you hit the website?
- Do you see all your site’s pages in Engagement > Pages and screens?
We'll verify events later on.
Tag Assistant
Use Google's Tag Assistant. This tool lets you view your website in a separate tab/window, and displays all your Google tags in another tab/window. As you enter your site, this tool will show all the Google tags that fire on each page.
It works for tags that you add to your site for GA4, Google Tag Manager, and Google Ads, making it very useful. The only caveat is that you must view each property (GA, Google Ads, etc) separately unless everything is installed using Google Tag Manager (more on this later in the chapter).
We'll show how to use this tool in more detail later in Project: Verify Pixels.
Phase 2: Configure ad channels
Each ad channel handles conversion tracking a little bit differently. Below, we show you how to prepare the major ad channels for conversion tracking.
We’ll go through the following ad channels:
- Facebook/Instagram
- Quora
- Google Ads (AdWords)
- Bing
At this point, you should have the different ad channels you’ll be running listed out in your conversion events doc.
Go through each channel you’ll be running, make an account on it, and then follow its setup instructions below. Come back to the verification section after it's implemented.
Skip the channels that aren’t relevant to you.
Shopify users: If you're using Shopify's native integrations for an ad channel, you can skip the instructions for that channel. We'll go through this in more detail in the Project: Shopify.
Facebook/Instagram
Preparing Facebook is a two-step process: creating your Facebook pixel and mapping conversion events.
The Facebook pixel goes on every single page of your site and app.
Create and set up the Facebook pixel
- Go to your Facebook Ads Manager account. Click the hamburger button in the sidebar.
- Click Business Settings in the menu.
- In the Business Settings sidebar, open the Data Sources dropdown. Then click Pixels.
- Click the Add button. A popup will appear to create a Facebook pixel for your site. Give it a name (like your company's name).
- You can enter your URL to see if easy setup options exist, like if your site uses WordPress, Shopify, or Squarespace.
- You can enter your URL to see if easy setup options exist, like if your site uses WordPress, Shopify, or Squarespace.
- Then click Continue.
- Facebook will tell you your pixel isn't ready to set up yet and give you the option to do this later. Select Set up the Pixel Now.
- Just like with domain verification, there are a few options for setting up your pixel: add code using a partner integration, manually add the pixel to your website, or email instructions to a developer. Choose the option that makes the most sense for your situation. For example, if you use WordPress or Shopify, add the pixel code using a partner integration.
Quora
Quora is almost identical to Facebook, with slightly different events.
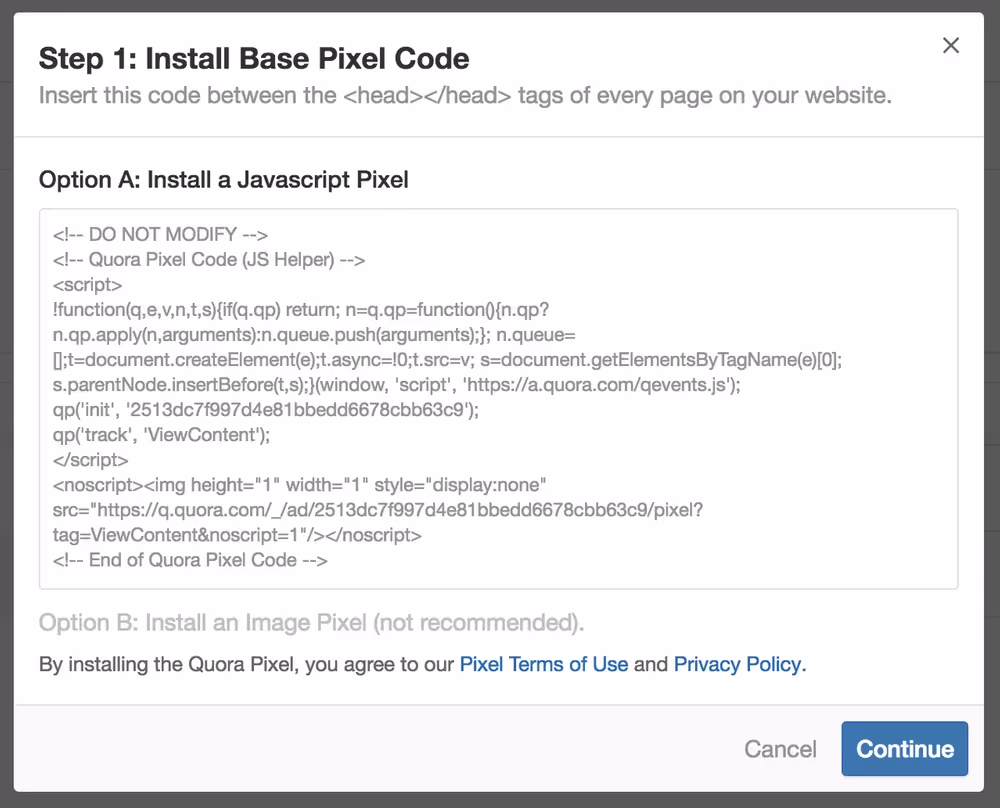
Create the Quora pixel
- Go to your Quora Ads Manager
- Click Quora Pixel in top navigation
- If no pixel currently exists, click Setup Pixel
- Add Quora to your conversion events doc in every section.
- In the "Pixels" section at the bottom of the doc, make a new "Quora" sub-section and copy over the full Pixel code.
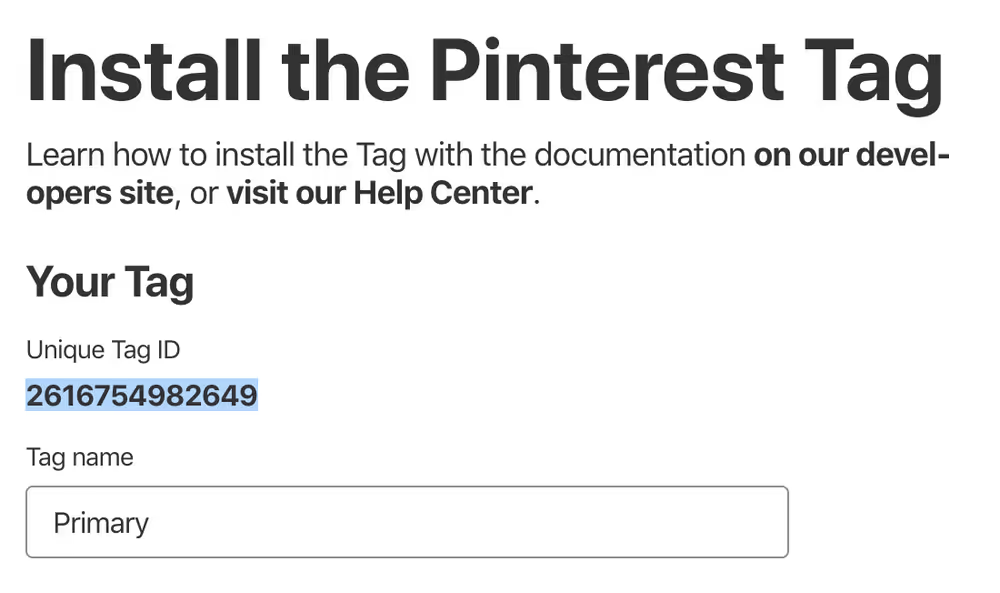
Pinterest is very similar to Facebook, except its conversion event names are different, and they call their pixel a “tag.”
Create the conversion tag
- Go to your Pinterest Ads Manager
- Click Ads > Conversion tracking in top navigation
- If no tag currently exists, click Create new Pinterest Tag
- Add Pinterest to your conversion events doc
- If using Segment: In the bottom "Pixels" section, copy over the Unique Tag ID into a "Pinterest" sub-section. If not using Segment, copy over the full Tag code.
Google Ads
Google Ads is done very differently. First, you install Google Ads through Google Analytics. Second, there are no pre-defined conversion events, meaning you get to create custom ones yourself (with whatever name you want).
Create conversion events
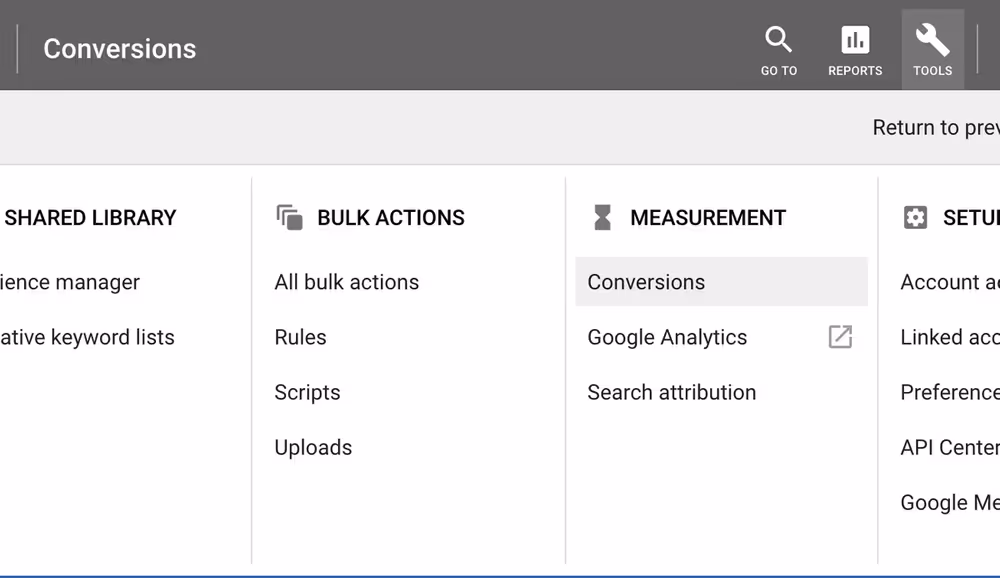
- Go to the Google Ads dashboard
- Click the wrench icon (tools) in the top right
- Click on Conversions
In Conversions
- Click the giant +Conversions sign
- Choose Website (assuming it’s not a mobile app)
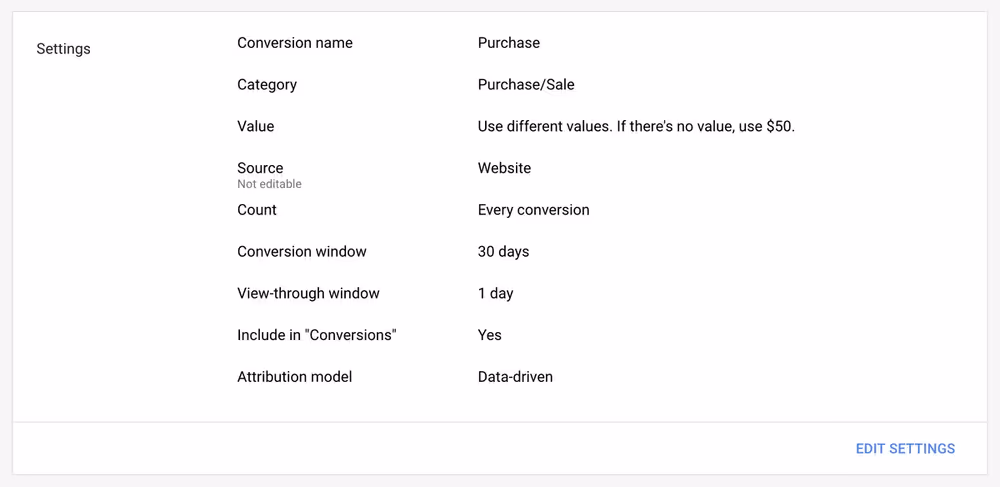
- Fill out the form:
- Name
- Name it exactly the same as it is in your conversion events doc
- Category
- The category only matters for some reporting purposes. Choose one from the list if it’s appropriate, like Purchase for a purchase.
- Value
- If a value is associated with the event, like the dollar amount someone spent, then choose: The value of this conversion action may vary (for instance, by purchase price). Set a default price if appropriate.
- Otherwise choose: Don't assign a value
- Count
- This affects the number of times Google records an event, every time the user triggers a conversion.
- Unless the conversion adds value to your business every time, like a purchase (revenue) or a referral, change Count to One. You don’t care if the same person created five accounts, but you do care if they make five purchases. So you’d set the sign up conversion to One and the purchase event to Every.
- Conversion window
- This means how long it generally takes for people to buy after they see an ad.
- Leave this as the default: the industry standard of 30 days.
- If it’s likely people will take longer than 30 days to convert because you have a long sales cycle or a free trial period, increase it to something more appropriate.
- We often do 30 days for eCommerce and 90 days for down funnel SaaS conversions.
- View-through conversion window
- If someone sees your ad and then independently Googles you without clicking it, that’s a view-through conversion.
- This is generally better left to 1 day. If people see your banner ad on a site or a video in YouTube, it’s likely they’d Google that day (or right then and there), or they won’t do anything at all. Setting this window much longer makes the number of conversions look higher than it should be. Because people may come to the site another way in the meantime.
- Include in "Conversions"
- By putting the right conversions in this “Include in ‘Conversions’” section, you have control over who Google shows your ads to overtime.
- Do you want to show more ads to people who are more likely to sign up for a free trial, or people who are more likely to upgrade to a paid account? You have control over this.
- If the conversion you’re tracking is the key event in your funnel, such as a Purchase or Upgrade, then make sure this box is ticked.
- It’s best to only have one or two conversion events included in “Conversions” so Google knows exactly what to optimize towards.
- If it’s just an incremental step in the funnel that’s useful to monitor, but is not absolutely critical or telling of a valued customer, untick this box.
- Attribution model(our recommendation is in part ii)
- We use attribution models to figure out how why someone converted — after they came to our site through more than one ad. For example, if someone clicks on 5 different ads before converting, each attribution model will distribute the conversion differently:
- Last click: Only click #5 would get attributed. Oftentimes this can be a “brand term search” — meaning they Googled your business name — since they learned of your business from the previous clicks and probably came back by googling your business’ name.
- First click: Only click #1 would get attributed. This gives all the credit to the first ad that got their attention.
- Linear: Gives all 5 clicks equal attribution. That means they’d each get 0.2 (1 conversion / 5 clicks) of a conversion
- Time Decay: Gives more credit to clicks that happened closer in time to the conversion using a 7-day half-life. Meaning a click 8 days before a conversion gets half as much credit as a click 1 day before a conversion, and a click 15 days after would get a quarter as much credit, and so on.
- Position Based: This would give credit to all 5, but would give clicks #1 and #5 40% credit each, and distribute the remaining 20% across the rest. For example, 0.4, 0.067, 0.67, 0.67, 0.4.
- Data-Driven:
- It uses machine learning and your own data to appropriately weigh the conversion. For example, if Google determines that one campaign consistently increases the conversions for other campaigns, it’ll get weighted higher.
- Data-Driven requires at least 15,000 clicks and 600 actions on the conversion in 30 days (and for it to maintain at least 400 actions per month thereafter) before you can select it.
- What we recommend (based on Google’s own recommendations)
- Do Time Decay for very early funnel events like a download or a product page view.
- Do Position Based for anything further down funnel
- Once you have enough data, and you’re confident it’ll stay there, switch to Data-Driven since it’ll be the most accurate
- Avoid Last click and First click models as much as possible. Last click gives too much credit to branded and retargeting campaigns (where you target people who have already heard of you).
- People will often come in on a prospecting campaign (the first time they hear about you) but convert later on branded/retargeting. First click would be the opposite problem.
- Both the first ad and last ad that people see are important.
- We use attribution models to figure out how why someone converted — after they came to our site through more than one ad. For example, if someone clicks on 5 different ads before converting, each attribution model will distribute the conversion differently:
- Name
- Click Save and continue
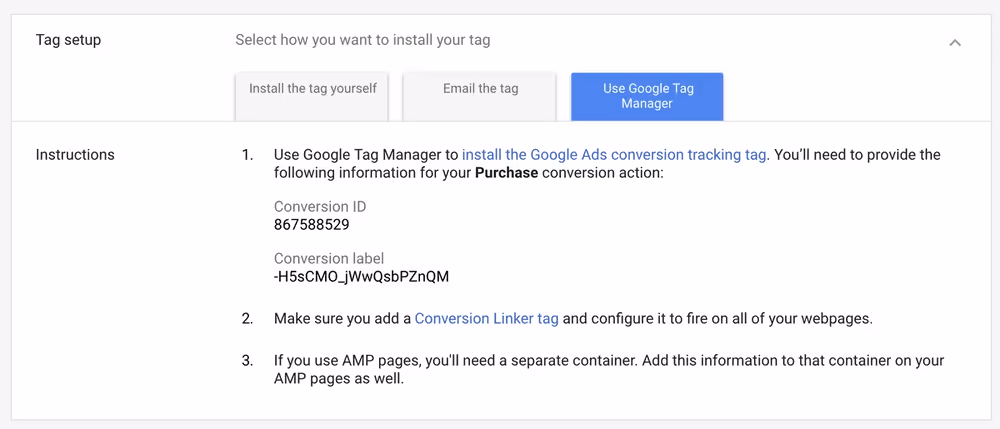
- Tag Setup: Add the event to your conversion events doc:
- Conversion ID: If this is your first conversion, choose Use Google Tag Manager (even if you're not) and copy-paste the Conversion ID (looks like 123456789) into the top of your conversion events doc
- Conversion Label: Choose Install the code yourself. Then scroll down to the Event snippet section and copy the code there
- Repeat the above steps for all remaining conversion events
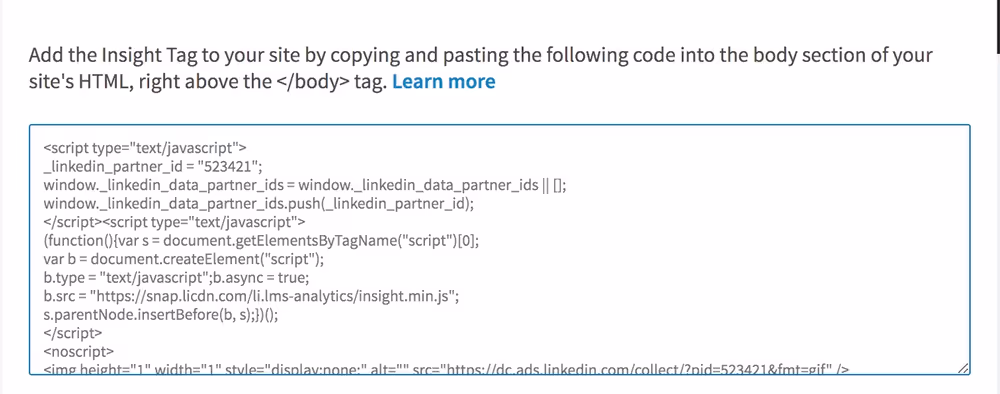
LinkedIn is also very similar to Facebook and Pinterest. You first have to create the base pixel (which in this case is called an “Insight Tag” by LinkedIn). Then, you have to create the pixels for the conversion events you want to track.
Create an Insight Tag:
- Go to your LinkedIn Ad Account
- Hover over Account Assets nav dropdown
- Click Insight Tag
- Create the insight tag
- Add the tag info to your conversion events:
- At the bottom of your conversion events doc, in the "Pixels" section, add a sub-section for LinkedIn and copy the entire tag into the doc. If using Segment, just copy over the partner id (523421 in the example below).
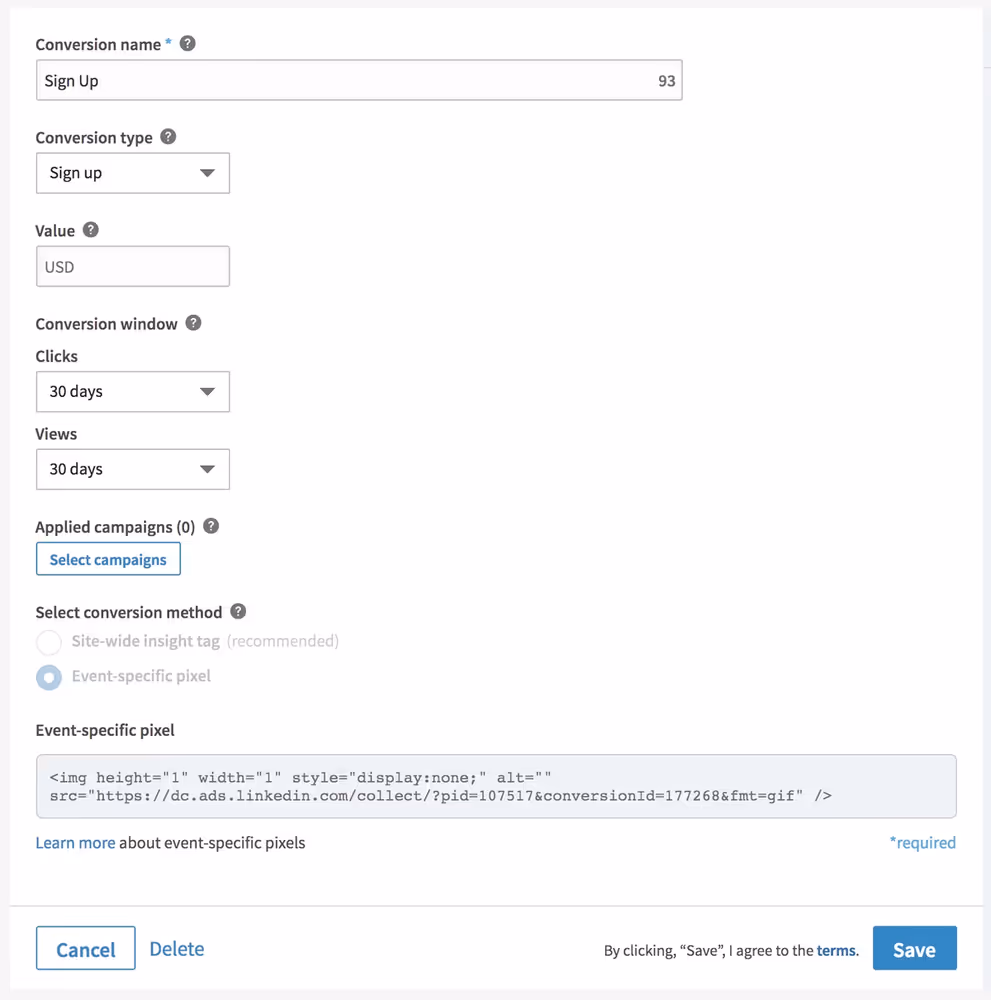
Create your conversion events:
- Hover over the Account Assets nav dropdown
- Click Conversion tracking
- Click Create new conversion
- Fill out the form.
- Conversion name: Match what it is in your conversion events doc
- Conversion type: Match the one that makes the most sense.
- Value: Add value if it’s relevant (generally only for purchase)
- Conversion window: We generally just leave to default. 30 day click-through and 1 day view-through would match the AdWords and Facebook defaults.
- Applied campaigns: LinkedIn is odd and forces you to choose the campaigns it applies to. If your campaigns are already made for some reason, add them now. If not, you can add the conversions to them later.
- Conversion method: Click Event-specific pixel and then copy the “img pixel” . Don’t use destination-based events; too much can go wrong. Ask us about it if you really want. Add it into the Pixels > LinkedIn section of your doc. Leave a comment saying which conversion event it should fire for.
- Save
- Repeat steps 1-11 for all your other conversion events.
Bing
Bing’s setup is almost identical to Google Analytics. But first you need to create the pixel/tag.
Generate a UET (Universal Event Tracking) tag:
- Go to Bing Ads Dashboard (https://bingads.microsoft.com/)
- Click Conversion Tracking (bottom left)
- Click UET tags
- Click Create UET tag
- Give it a name. We’re only going to have one so make it simple like UET
- At the bottom of your conversion events doc, in the "Pixels" section, add a sub-section for Bing and copy the entire tag into the doc. If using Segment, just copy over the ID.
Set up conversion goals:
- Click Conversion goals
- Click Create conversion goal
- Create the goal exactly the same as in GA
- Repeat for all key conversion events
Next
Now go back to Conversion Events > Overview of Projects and choose how you'd like to install the pixels onto your site.